If you have ever logged into a website, accessed your dashboard, or used an online banking app, you have already used authentication and authorization.
These two terms are often used together, but they solve two different security problems.
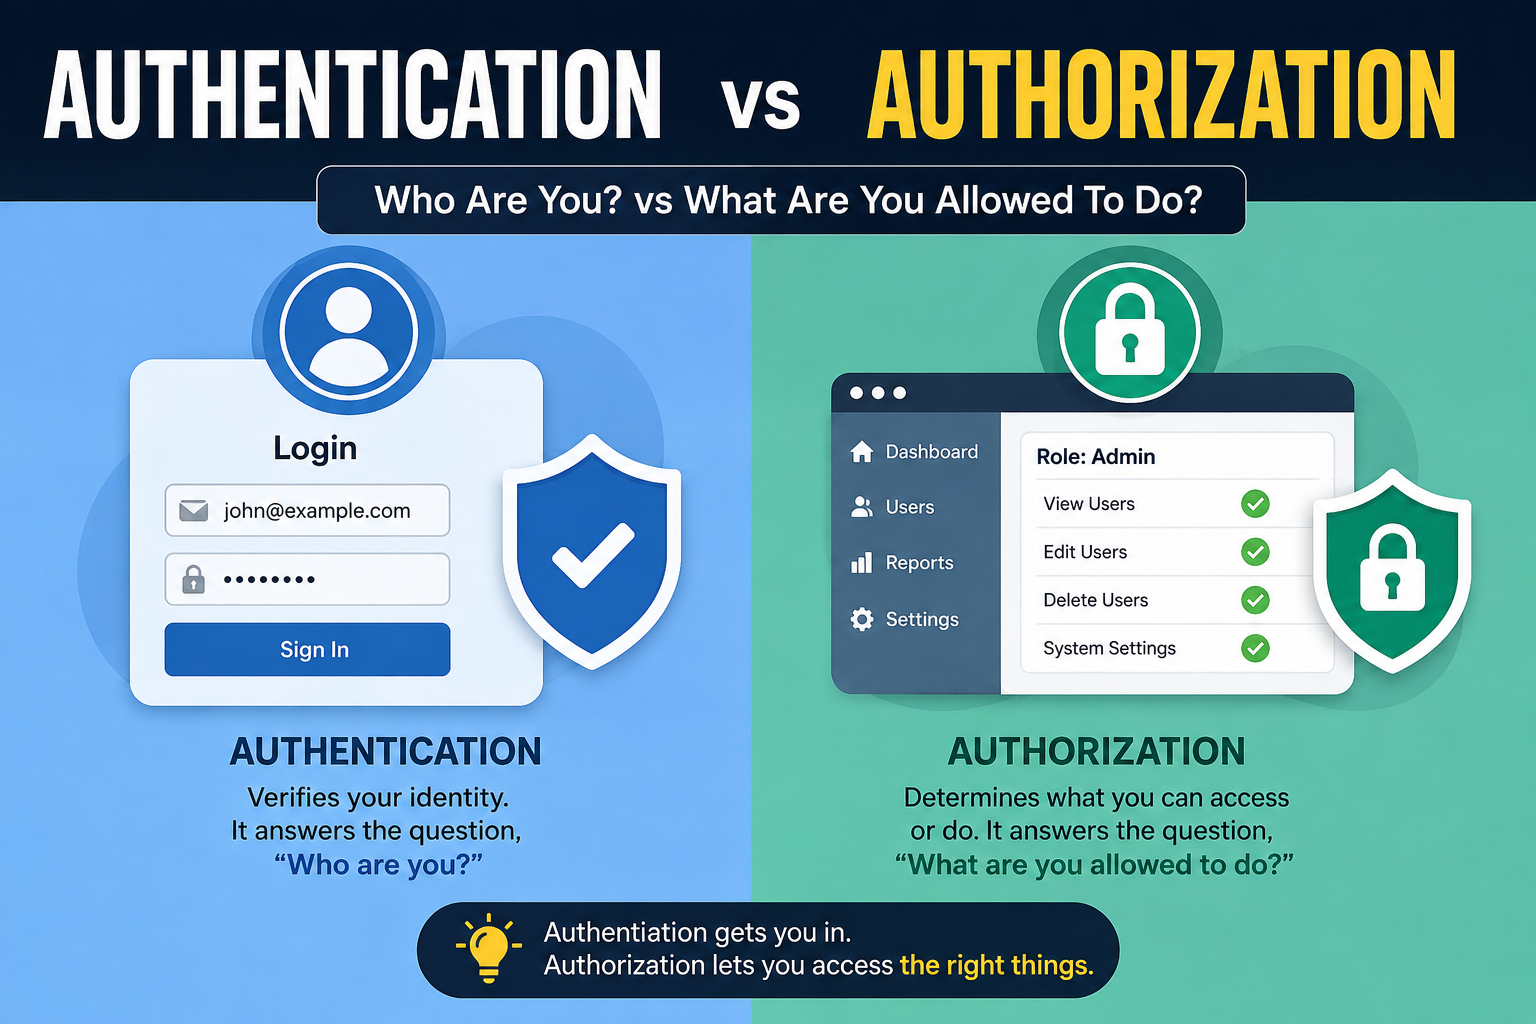
Authentication asks: “Who are you?”
Authorization asks: “What are you allowed to do?”
Understanding the difference between authentication and authorization is essential for developers building websites, mobile apps, APIs, and other software systems.
What Is Authentication?
Authentication is the process of verifying a user’s identity.
When you log into an application using your email and password, the application checks whether those credentials belong to you.
For example:
Email: john@example.com
Password: ********
If the credentials are correct, the application knows that the person attempting to log in is John.
Common Authentication Methods
Authentication can happen in several ways:
- Email and password
- Phone number and OTP
- Google login
- Apple login
- Facebook login
- Biometric authentication
- Passkeys
- Multi-factor authentication (MFA)
Example of Authentication
Imagine you are using an e-commerce application.
You enter:
Email: john@example.com
Password: myPassword
The server checks your credentials.
If they are valid:
Authentication successful
The application now knows who you are.
However, this does not automatically mean you can access everything in the application.
That’s where authorization comes in.
What Is Authorization?
Authorization is the process of determining what an authenticated user is allowed to access or perform.
Once the application knows who you are, it needs to determine what permissions you have.
For example, suppose an application has three types of users:
Admin
Doctor
Patient
After logging in, each user may have different permissions.
| User | Can View Profile | Can Manage Users | Can Delete Users |
|---|---|---|---|
| Admin | Yes | Yes | Yes |
| Doctor | Yes | No | No |
| Patient | Yes | No | No |
All three users can be authenticated successfully.
But their authorization is different.
Simple Example
Suppose John logs into an admin dashboard.
Authentication checks:
Is John really John?
Authorization checks:
Is John allowed to delete users?
The first question is authentication.
The second question is authorization.
Authentication vs Authorization
The easiest way to remember the difference is:
Authentication = Who are you?
Authorization = What can you do?
Here is a simple comparison:
| Authentication | Authorization |
|---|---|
| Verifies identity | Verifies permissions |
| Happens during login | Usually happens after authentication |
| Answers “Who are you?” | Answers “What can you access?” |
| Uses passwords, OTPs, biometrics, etc. | Uses roles, permissions, policies, etc. |
| Comes before authorization | Depends on an authenticated identity |
Real-World Example
Think about entering an office building.
First, you show your employee ID card to security.
The security guard checks:
“Is this really you?”
This is authentication.
After entering the building, you try to enter the server room.
Your ID card may not give you permission to enter that room.
The security system checks:
“Does this person have permission to enter the server room?”
This is authorization.
So:
Authentication → Verify identity
Authorization  → Verify permission
How Authentication Works in a Web Application
A typical login flow looks something like this:
User
  ↓
Enters email + password
  ↓
Frontend sends credentials to server
  ↓
Server verifies credentials
  ↓
Authentication successful
  ↓
Server creates session/token
  ↓
User can access protected resources
For example, a backend might have an endpoint:
POST /api/login
The user sends:
{
  "email": "john@example.com",
  "password": "password123"
}
The server verifies the credentials.
If everything is correct, the server may return a session or access token.
For example:
{
  "accessToken": "eyJhbGciOi..."
}
The client can then use that token when making authenticated requests.
How Authorization Works in a Web Application
After authentication, the application can determine the user’s role.
For example:
{
  "id": "123",
  "name": "John",
  "role": "admin"
}
Now suppose John requests:
DELETE /api/users/456
The server can check:
Is the user authenticated?
        ↓
Yes
        ↓
What is the user's role?
        ↓
Admin
        ↓
Does admin have delete permission?
        ↓
Yes
        ↓
Allow request
If the user is a regular customer:
Authenticated?
     ↓
Yes
     ↓
Role = customer
     ↓
Delete permission?
     ↓
No
     ↓
403 Forbidden
This is authorization.
Authentication and Authorization in Node.js
In a Node.js application, authentication and authorization are often implemented using middleware.
For example:
const authenticate = (req, res, next) => {
  // Verify token
  // Identify user

  req.user = user;

  next();
};
Then an authorization middleware can check the user’s role:
const authorizeAdmin = (req, res, next) => {
  if (req.user.role !== "admin") {
    return res.status(403).json({
      message: "Access denied"
    });
  }

  next();
};
The route can then use both:
router.delete(
  "/users/:id",
  authenticate,
  authorizeAdmin,
  deleteUser
);
The flow becomes:
Request
   ↓
Authentication
   ↓
Identify user
   ↓
Authorization
   ↓
Check permissions
   ↓
Controller
Authentication Doesn’t Mean Full Access
One of the most common mistakes beginners make is thinking:
“If the user is logged in, they can access the resource.”
That’s not necessarily true.
Being authenticated only proves the user’s identity.
For example:
User: John
Role: Patient
Authenticated: Yes
John can access his own profile.
But he should not automatically be able to access:
Admin dashboard
Other patients' medical records
User management
System settings
Those resources require additional authorization checks.
Role-Based Authorization
One common authorization approach is Role-Based Access Control (RBAC).
Users are assigned roles such as:
Admin
Manager
Employee
Customer
Each role has specific permissions.
For example:
Admin
 ├── Create users
 ├── Update users
 ├── Delete users
 └── View reports

Manager
 ├── View users
 ├── Update employees
 └── View reports

Employee
 ├── View profile
 └── Update profile
The application checks the user’s role before allowing protected operations.
Authentication Tokens
Modern applications commonly use tokens for authentication.
One popular option is JSON Web Token (JWT).
After successful login, the server can generate a JWT:
User logs in
     ↓
Credentials verified
     ↓
JWT generated
     ↓
JWT sent to client
     ↓
Client sends JWT with future requests
     ↓
Server verifies JWT
A request may contain:
Authorization: Bearer <token>
The server verifies the token before processing the request.
However, a valid token alone does not mean the user has permission to perform every operation. Authorization still needs to be checked separately.
Authentication vs Authorization: A Simple Analogy
Think of an airport.
Authentication
You show your passport at security.
The airport verifies:
“Are you really this person?”
That’s authentication.
Authorization
After entering the airport, you may have access to the passenger area.
But you cannot enter:
- Pilot-only areas
- Security rooms
- Control rooms
- Restricted staff areas
The system checks what you are allowed to access.
That’s authorization.
Common HTTP Status Codes
Authentication and authorization errors often use different HTTP status codes.
401 Unauthorized
A 401 Unauthorized response generally means the request has not been successfully authenticated.
For example:
No token
Invalid token
Expired token
Invalid credentials
403 Forbidden
A 403 Forbidden response generally means the server knows who the user is, but the user doesn’t have permission to perform the requested action.
For example:
User is authenticated
User role = customer
Requested action = delete user
Permission = denied
So a useful way to remember them is:
401 → Authentication problem
403 → Authorization problem
Authentication and Authorization Security Best Practices
When implementing authentication and authorization, developers should follow good security practices.
1. Never Store Passwords as Plain Text
Passwords should be securely hashed using algorithms such as bcrypt, scrypt, or Argon2.
Never store:
password123
directly in the database.
2. Use HTTPS
Credentials and authentication tokens should be transmitted over HTTPS.
3. Use Short-Lived Access Tokens
Access tokens should generally have reasonable expiration times.
Refresh-token strategies can be used when longer sessions are required.
4. Validate Permissions on the Server
Never rely only on frontend checks.
For example, hiding a delete button doesn’t prevent a malicious user from manually calling:
DELETE /api/users/123
The backend must verify authorization.
5. Follow the Principle of Least Privilege
Users should receive only the permissions they actually need.
A regular customer shouldn’t receive administrator permissions simply because they are authenticated.
6. Consider Multi-Factor Authentication
For sensitive applications, MFA can provide an additional layer of security beyond passwords.
Authentication vs Authorization: Quick Summary
The difference is actually quite simple:
Authentication
      ↓
Who are you?
      ↓
Verify identity
      ↓
Login / OTP / Biometrics / Passkey
And:
Authorization
      ↓
What can you do?
      ↓
Verify permissions
      ↓
Roles / Permissions / Policies
You can remember it with this simple example:
Authentication gets you through the door. Authorization decides which rooms you can enter.
Conclusion
Authentication and authorization are two fundamental parts of application security.
Authentication verifies the identity of a user, while authorization determines what that authenticated user is allowed to access or do.
For modern applications, both are important. A secure login system is not enough if users can access resources they shouldn’t be able to access.
Whether you’re building a Node.js API, React application, mobile app, SaaS platform, or enterprise system, understanding the difference between authentication and authorization will help you design more secure applications.
In short:
🔐 Authentication = Who are you?
🛡️ Authorization = What are you allowed to do?