Most modern Flutter applications use token-based authentication to communicate securely with backend APIs.
After a user logs in, the server commonly returns two tokens:
- Access token — short-lived token used for authenticated API requests.
- Refresh token — longer-lived token used to obtain a new access token.
The problem is that access tokens eventually expire.
If your Flutter app does not handle expiration correctly, users may suddenly receive 401 Unauthorized errors and be forced to log in again.
A better approach is to refresh the access token automatically and retry the failed request without interrupting the user.
In this guide, we’ll build a practical token-refresh system using Flutter + Dio + Interceptors + secure token storage.
How Token Authentication Usually Works
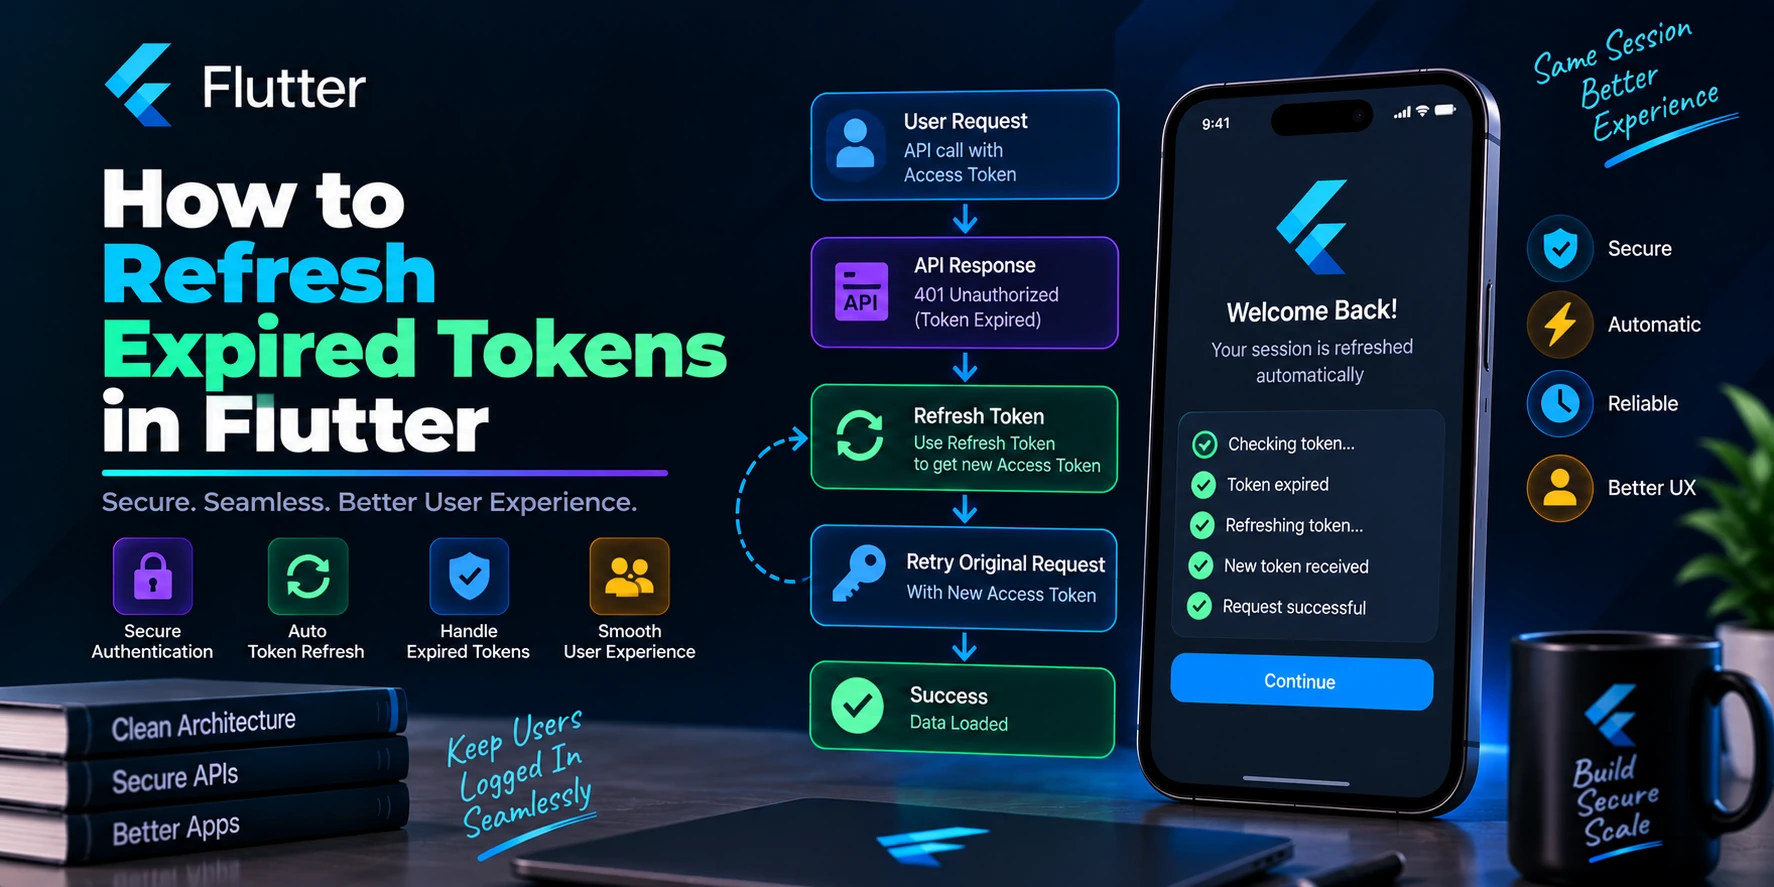
A typical authentication flow looks like this:
User Login
    ↓
Backend validates credentials
    ↓
Access Token + Refresh Token
    ↓
Flutter stores tokens securely
    ↓
Access Token added to API requests
    ↓
Access Token expires
    ↓
API returns 401
    ↓
Flutter sends Refresh Token
    ↓
Backend returns new Access Token
    ↓
Flutter saves new token
    ↓
Original API request is retried
The user does not need to log in again unless the refresh token itself has expired or become invalid.
Access Token vs Refresh Token
Understanding the difference is important before implementing refresh logic.
| Access Token | Refresh Token |
|---|---|
| Used for normal API requests | Used to obtain new access tokens |
| Usually short-lived | Usually longer-lived |
| Sent frequently | Sent only when refreshing |
| Expiration is expected | Expiration usually requires login |
| Commonly sent in Authorization header | Usually sent to refresh endpoint |
For example, your login API might return:
{
  "access_token": "eyJhbGciOi...",
  "refresh_token": "eyJhbGciOi...",
  "expires_in": 3600
}
The access token may expire after one hour while the refresh token remains valid much longer.
Why Should Tokens Expire?
You might wonder why the backend cannot simply create a token that never expires.
Long-lived access tokens increase security risk.
If an access token is stolen and never expires, an attacker could potentially continue using it indefinitely.
Short-lived access tokens reduce that window.
Refresh tokens allow the application to obtain new access tokens without repeatedly asking the user for their password.
Flutter Packages
For this example, we’ll use Dio for networking and flutter_secure_storage for sensitive token storage.
Add the packages to pubspec.yaml:
dependencies:
  flutter:
    sdk: flutter

  dio: ^5.0.0
  flutter_secure_storage: ^9.0.0
Use current compatible package versions for your project rather than copying version numbers blindly.
Then run:
flutter pub get
Recommended Project Structure
For a medium or large Flutter application, keep authentication and networking responsibilities separated.
lib/
│
├── core/
│   ├── api/
│   │   ├── api_client.dart
│   │   ├── api_endpoints.dart
│   │   └── auth_interceptor.dart
│   │
│   ├── storage/
│   │   └── token_storage.dart
│   │
│   ├── error/
│   │   ├── exceptions.dart
│   │   └── failures.dart
│   │
│   └── utils/
│       └── app_constants.dart
│
└── features/
    └── auth/
        ├── data/
        │   ├── dto/
        │   ├── data_sources/
        │   └── repositories/
        │
        ├── domain/
        │   ├── entities/
        │   └── repositories/
        │
        └── presentation/
            ├── controllers/
            ├── screens/
            └── widgets/
For smaller applications, you can simplify this structure.
The important part is keeping token storage and refresh logic away from individual screens.
Step 1: Create Token Storage
Avoid storing authentication tokens directly inside widgets or controllers.
Create:
lib/core/storage/token_storage.dart
Then:
import 'package:flutter_secure_storage/flutter_secure_storage.dart';

class TokenStorage {
  static const _accessTokenKey = 'access_token';
  static const _refreshTokenKey = 'refresh_token';

  final FlutterSecureStorage _storage;

  TokenStorage(this._storage);

  Future<void> saveTokens({
    required String accessToken,
    required String refreshToken,
  }) async {
    await Future.wait([
      _storage.write(
        key: _accessTokenKey,
        value: accessToken,
      ),
      _storage.write(
        key: _refreshTokenKey,
        value: refreshToken,
      ),
    ]);
  }

  Future<void> saveAccessToken(String token) async {
    await _storage.write(
      key: _accessTokenKey,
      value: token,
    );
  }

  Future<String?> getAccessToken() {
    return _storage.read(key: _accessTokenKey);
  }

  Future<String?> getRefreshToken() {
    return _storage.read(key: _refreshTokenKey);
  }

  Future<void> clearTokens() async {
    await Future.wait([
      _storage.delete(key: _accessTokenKey),
      _storage.delete(key: _refreshTokenKey),
    ]);
  }
}
Now token storage has one clear responsibility.
Why Use Secure Storage?
Avoid treating sensitive authentication credentials like ordinary application preferences.
For example, using something like this for long-lived sensitive credentials is generally undesirable:
SharedPreferences prefs;
Secure storage uses platform security facilities to provide stronger protection for sensitive values.
That makes it more appropriate for refresh tokens and other authentication secrets.
Remember, however, that no client-side storage mechanism makes a compromised device completely safe.
Step 2: Create API Endpoints
Create:
lib/core/api/api_endpoints.dart
class ApiEndpoints {
  static const String baseUrl =
      'https://api.example.com';

  static const String login = '/auth/login';
  static const String refreshToken = '/auth/refresh';
  static const String profile = '/user/profile';
}
Centralizing endpoints makes future API changes easier to manage.
Step 3: Configure Dio
Create:
lib/core/api/api_client.dart
import 'package:dio/dio.dart';

class ApiClient {
  final Dio dio;

  ApiClient()
      : dio = Dio(
          BaseOptions(
            baseUrl: ApiEndpoints.baseUrl,
            connectTimeout: const Duration(seconds: 20),
            receiveTimeout: const Duration(seconds: 20),
            sendTimeout: const Duration(seconds: 20),
            headers: {
              'Accept': 'application/json',
              'Content-Type': 'application/json',
            },
          ),
        );
}
Later we’ll attach our authentication interceptor to this Dio instance.
Step 4: Add Access Token Automatically
Without an interceptor, you might repeatedly write:
final token = await tokenStorage.getAccessToken();

await dio.get(
  '/profile',
  options: Options(
    headers: {
      'Authorization': 'Bearer $token',
    },
  ),
);
Repeating this across every API call is unnecessary.
Instead, an interceptor can attach the token automatically.
Create AuthInterceptor
Create:
lib/core/api/auth_interceptor.dart
Start with:
class AuthInterceptor extends Interceptor {
  final Dio dio;
  final TokenStorage tokenStorage;

  AuthInterceptor({
    required this.dio,
    required this.tokenStorage,
  });

  @override
  void onRequest(
    RequestOptions options,
    RequestInterceptorHandler handler,
  ) async {
    final accessToken =
        await tokenStorage.getAccessToken();

    if (accessToken != null &&
        accessToken.isNotEmpty) {
      options.headers['Authorization'] =
          'Bearer $accessToken';
    }

    handler.next(options);
  }
}
Now authenticated requests automatically receive:
Authorization: Bearer ACCESS_TOKEN
Step 5: Detect an Expired Access Token
Many APIs return:
401 Unauthorized
when an access token is invalid or expired.
We can detect this inside onError().
@override
void onError(
  DioException err,
  ErrorInterceptorHandler handler,
) async {
  if (err.response?.statusCode == 401) {
    // Refresh token
  }

  handler.next(err);
}
However, we should not immediately refresh on every 401.
There are several edge cases we need to handle.
Step 6: Create the Refresh Token Request
Suppose your backend expects:
{
  "refresh_token": "REFRESH_TOKEN"
}
and returns:
{
  "access_token": "NEW_ACCESS_TOKEN",
  "refresh_token": "NEW_REFRESH_TOKEN"
}
Create a method:
Future<String?> _refreshAccessToken() async {
  final refreshToken =
      await tokenStorage.getRefreshToken();

  if (refreshToken == null ||
      refreshToken.isEmpty) {
    return null;
  }

  try {
    final response = await dio.post(
      ApiEndpoints.refreshToken,
      data: {
        'refresh_token': refreshToken,
      },
    );

    final newAccessToken =
        response.data['access_token'] as String?;

    final newRefreshToken =
        response.data['refresh_token'] as String?;

    if (newAccessToken == null) {
      return null;
    }

    await tokenStorage.saveTokens(
      accessToken: newAccessToken,
      refreshToken:
          newRefreshToken ?? refreshToken,
    );

    return newAccessToken;
  } catch (_) {
    return null;
  }
}
One important detail is refresh-token rotation.
Some servers return a new refresh token every time you refresh.
If your backend does this, always replace the old refresh token.
Step 7: Retry the Failed Request
Getting a new token is only half the job.
Imagine this request fails:
GET /user/profile
The application refreshes the token successfully.
The original profile request still failed.
Therefore, we need to retry it.
The original request is available through:
err.requestOptions
We can copy its configuration and send it again.
Basic Retry Implementation
Future<Response<dynamic>> _retryRequest(
  RequestOptions requestOptions,
  String accessToken,
) {
  final headers =
      Map<String, dynamic>.from(
    requestOptions.headers,
  );

  headers['Authorization'] =
      'Bearer $accessToken';

  return dio.request<dynamic>(
    requestOptions.path,
    data: requestOptions.data,
    queryParameters:
        requestOptions.queryParameters,
    options: Options(
      method: requestOptions.method,
      headers: headers,
      responseType:
          requestOptions.responseType,
      contentType:
          requestOptions.contentType,
      followRedirects:
          requestOptions.followRedirects,
      validateStatus:
          requestOptions.validateStatus,
      receiveDataWhenStatusError:
          requestOptions.receiveDataWhenStatusError,
    ),
  );
}
Now the request can be retried using the new access token.
Complete Basic onError Flow
@override
void onError(
  DioException err,
  ErrorInterceptorHandler handler,
) async {
  if (err.response?.statusCode != 401) {
    return handler.next(err);
  }

  final newAccessToken =
      await _refreshAccessToken();

  if (newAccessToken == null) {
    await tokenStorage.clearTokens();

    return handler.next(err);
  }

  try {
    final response = await _retryRequest(
      err.requestOptions,
      newAccessToken,
    );

    return handler.resolve(response);
  } catch (_) {
    return handler.next(err);
  }
}
The flow is now:
Request
   ↓
401
   ↓
Refresh Token
   ↓
New Access Token
   ↓
Save Token
   ↓
Retry Original Request
   ↓
Return Response
This works for the basic case.
But there is a serious problem in production applications.
The Multiple 401 Problem
Imagine your dashboard sends five API requests simultaneously:
/profile
/notifications
/orders
/wishlist
/settings
The access token has expired.
All five requests receive 401.
Without protection, every request may call:
/auth/refresh
at almost the same time.
You could end up with:
401 → Refresh
401 → Refresh
401 → Refresh
401 → Refresh
401 → Refresh
This is inefficient and can be especially problematic when your backend rotates refresh tokens.
Instead, you generally want:
Multiple 401 responses
        ↓
One refresh request
        ↓
New token
        ↓
Waiting requests continue/retry
Step 8: Prevent Multiple Refresh Requests
One approach is to keep a shared refresh operation.
Future<String?>? _refreshFuture;
Then:
Future<String?> _getRefreshedToken() {
  _refreshFuture ??= _refreshAccessToken();

  return _refreshFuture!.whenComplete(() {
    _refreshFuture = null;
  });
}
However, concurrent asynchronous code deserves careful handling. The important principle is that all failed requests should share the same in-progress refresh rather than starting separate refresh calls.
A practical interceptor can look like this.
Production-Style AuthInterceptor
import 'package:dio/dio.dart';

class AuthInterceptor extends Interceptor {
  final Dio dio;
  final Dio refreshDio;
  final TokenStorage tokenStorage;

  Future<String?>? _refreshFuture;

  AuthInterceptor({
    required this.dio,
    required this.refreshDio,
    required this.tokenStorage,
  });

  @override
  void onRequest(
    RequestOptions options,
    RequestInterceptorHandler handler,
  ) async {
    final isRefreshRequest =
        options.path == ApiEndpoints.refreshToken;

    if (!isRefreshRequest) {
      final accessToken =
          await tokenStorage.getAccessToken();

      if (accessToken != null &&
          accessToken.isNotEmpty) {
        options.headers['Authorization'] =
            'Bearer $accessToken';
      }
    }

    handler.next(options);
  }

  @override
  void onError(
    DioException err,
    ErrorInterceptorHandler handler,
  ) async {
    final statusCode =
        err.response?.statusCode;

    final requestOptions =
        err.requestOptions;

    final isRefreshRequest =
        requestOptions.path ==
            ApiEndpoints.refreshToken;

    if (statusCode != 401 ||
        isRefreshRequest) {
      return handler.next(err);
    }

    final alreadyRetried =
        requestOptions.extra['retried'] == true;

    if (alreadyRetried) {
      return handler.next(err);
    }

    try {
      final newToken =
          await _getRefreshedToken();

      if (newToken == null) {
        await _handleRefreshFailure();

        return handler.next(err);
      }

      requestOptions.extra['retried'] = true;

      final response = await _retryRequest(
        requestOptions,
        newToken,
      );

      return handler.resolve(response);
    } catch (_) {
      await _handleRefreshFailure();

      return handler.next(err);
    }
  }

  Future<String?> _getRefreshedToken() {
    final existing = _refreshFuture;

    if (existing != null) {
      return existing;
    }

    final future = _refreshAccessToken();
    _refreshFuture = future;

    future.whenComplete(() {
      if (identical(_refreshFuture, future)) {
        _refreshFuture = null;
      }
    });

    return future;
  }

  Future<String?> _refreshAccessToken() async {
    final refreshToken =
        await tokenStorage.getRefreshToken();

    if (refreshToken == null ||
        refreshToken.isEmpty) {
      return null;
    }

    try {
      final response =
          await refreshDio.post(
        ApiEndpoints.refreshToken,
        data: {
          'refresh_token': refreshToken,
        },
      );

      final data =
          response.data as Map<String, dynamic>;

      final accessToken =
          data['access_token'] as String?;

      final newRefreshToken =
          data['refresh_token'] as String?;

      if (accessToken == null ||
          accessToken.isEmpty) {
        return null;
      }

      await tokenStorage.saveTokens(
        accessToken: accessToken,
        refreshToken:
            newRefreshToken ?? refreshToken,
      );

      return accessToken;
    } on DioException {
      return null;
    }
  }

  Future<Response<dynamic>> _retryRequest(
    RequestOptions requestOptions,
    String accessToken,
  ) {
    final headers =
        Map<String, dynamic>.from(
      requestOptions.headers,
    );

    headers['Authorization'] =
        'Bearer $accessToken';

    return dio.request<dynamic>(
      requestOptions.path,
      data: requestOptions.data,
      queryParameters:
          requestOptions.queryParameters,
      options: Options(
        method: requestOptions.method,
        headers: headers,
        responseType:
            requestOptions.responseType,
        contentType:
            requestOptions.contentType,
        followRedirects:
            requestOptions.followRedirects,
        validateStatus:
            requestOptions.validateStatus,
        receiveDataWhenStatusError:
            requestOptions.receiveDataWhenStatusError,
        extra: requestOptions.extra,
      ),
    );
  }

  Future<void> _handleRefreshFailure() async {
    await tokenStorage.clearTokens();

    // Notify your authentication/session layer here.
  }
}
This is much closer to what you would want in a real Flutter application.
Why Use a Separate Dio for Refresh Requests?
Notice that the previous example receives:
final Dio dio;
final Dio refreshDio;
This is intentional.
Suppose your normal Dio instance has the authentication interceptor attached.
Then the following can happen:
Normal Request
     ↓
401
     ↓
Interceptor
     ↓
Refresh Request
     ↓
401
     ↓
Same Interceptor
     ↓
Refresh Again
     ↓
401
     ↓
...
That can create an interceptor loop.
Using a dedicated Dio instance for token refreshing helps isolate the refresh endpoint from the normal authentication interceptor.
For example:
final dio = Dio(
  BaseOptions(
    baseUrl: ApiEndpoints.baseUrl,
  ),
);

final refreshDio = Dio(
  BaseOptions(
    baseUrl: ApiEndpoints.baseUrl,
  ),
);
Then:
final tokenStorage = TokenStorage(
  const FlutterSecureStorage(),
);

dio.interceptors.add(
  AuthInterceptor(
    dio: dio,
    refreshDio: refreshDio,
    tokenStorage: tokenStorage,
  ),
);
Now refreshDio does not run through the normal authentication interceptor.
Prevent Infinite Retry Loops
Another important protection is:
requestOptions.extra['retried']
Before retrying:
final alreadyRetried =
    requestOptions.extra['retried'] == true;

if (alreadyRetried) {
  return handler.next(err);
}
Then mark the request:
requestOptions.extra['retried'] = true;
Why?
Imagine:
Original Request
      ↓
401
      ↓
Refresh succeeds
      ↓
Retry
      ↓
401 again
Without a retry guard, your app could repeatedly refresh and retry.
A request should normally be retried only once after token refresh.
Handling Refresh Token Expiration
Eventually, the refresh token may also become invalid.
The server might return:
401 Unauthorized
or:
403 Forbidden
depending on the backend’s authentication design.
When refresh authentication genuinely fails, clear the session.
Future<void> logout() async {
  await tokenStorage.clearTokens();
}
Then your authentication state can redirect the user to the login screen.
With GetX, for example, navigation could be handled by your session/auth controller rather than directly inside the networking class.
Get.offAllNamed('/login');
For cleaner architecture, however, it is often preferable for the interceptor to notify an authentication/session service.
That service can then update application state and let the presentation layer react.
Avoid Navigating Directly from the Interceptor
This works:
Get.offAllNamed('/login');
inside your interceptor.
But it tightly couples:
Networking
    ↓
Navigation
A cleaner architecture is:
Interceptor
    ↓
Session Manager
    ↓
Authentication State
    ↓
Router/UI
For example:
class SessionManager {
  final TokenStorage tokenStorage;

  SessionManager(this.tokenStorage);

  final StreamController<bool>
      _sessionController =
      StreamController<bool>.broadcast();

  Stream<bool> get sessionStream =>
      _sessionController.stream;

  Future<void> expireSession() async {
    await tokenStorage.clearTokens();

    _sessionController.add(false);
  }
}
Your app-level authentication logic can listen for session changes and navigate accordingly.
Should You Check JWT Expiration Before Every Request?
There are two common strategies.
Strategy 1: Wait for 401
Request
 ↓
Server returns 401
 ↓
Refresh
 ↓
Retry
This is straightforward because the server remains the authority on whether the token is accepted.
Strategy 2: Check Expiration Before Sending
If your access token is a JWT containing an expiration claim, the application can inspect its expiration time.
Conceptually:
if (tokenWillExpireSoon) {
  await refreshToken();
}
Then send the request.
This can reduce avoidable 401 responses.
However, client-side JWT decoding should only be treated as a scheduling optimization. The backend must still validate the token.
Refresh Before the Exact Expiration Time
If you implement proactive refreshing, avoid waiting until the exact expiration second.
Suppose the token expires at:
10:30:00
and your application sends a request at:
10:29:59
Network latency might mean the server receives or processes it after expiration.
Instead, consider a small safety window.
For example:
Token expires in less than 60 seconds
             ↓
Refresh before request
The appropriate window depends on your backend and application.
Handling Token Expiration with JWT
A JWT commonly contains an exp claim.
Conceptually:
{
  "sub": "123",
  "exp": 1789713000
}
You can decode the payload and determine whether expiration is approaching.
A helper might expose:
bool shouldRefreshToken(
  DateTime expiryTime,
) {
  final refreshAt = expiryTime.subtract(
    const Duration(minutes: 1),
  );

  return DateTime.now().isAfter(refreshAt);
}
However, device clocks can be incorrect.
Therefore, server-side rejection must remain the final authority.
Handling Concurrent Requests Correctly
Concurrency is one of the most overlooked token-refresh problems.
Imagine:
Request A → 401
Request B → 401
Request C → 401
The wrong implementation performs:
A → Refresh 1
B → Refresh 2
C → Refresh 3
The desired implementation is:
A ─┐
B ─┼→ Wait → Single Refresh → New Token
C ─┘

A → Retry
B → Retry
C → Retry
Sharing a single refresh Future is one practical way to accomplish this.
Refresh Token Rotation
Some authentication servers rotate refresh tokens.
For example:
Refresh Token A
      ↓
Refresh Request
      ↓
Access Token B
Refresh Token B
After that request:
Refresh Token A
may become invalid.
This is another reason multiple simultaneous refresh requests can cause serious problems.
If Request A uses Refresh Token A and receives Refresh Token B, Request B might still try to use the now-invalid Refresh Token A.
Single-flight refresh logic prevents that race condition.
What If Refresh API Returns Only an Access Token?
Some APIs return:
{
  "access_token": "NEW_TOKEN"
}
without rotating the refresh token.
In that case:
await tokenStorage.saveAccessToken(
  accessToken,
);
is enough.
Do not assume every backend follows the same refresh-token response structure.
Your Flutter implementation should match the authentication contract of your API.
Do Not Refresh Every 401 Automatically
A 401 does not always mean:
Access token expired.
It might mean:
- Token expired
- Token malformed
- Token revoked
- Invalid authentication credentials
- User account disabled
- Incorrect authorization header
- Refresh token invalid
- Authentication policy changed
If your backend provides an error code, use it.
For example:
{
  "code": "ACCESS_TOKEN_EXPIRED",
  "message": "Access token expired"
}
Then:
final code =
    err.response?.data?['code'];

if (err.response?.statusCode == 401 &&
    code == 'ACCESS_TOKEN_EXPIRED') {
  // Refresh token
}
This is safer than assuming every 401 requires refreshing.
Avoid Refreshing Login Requests
Your login endpoint may itself return 401 when credentials are incorrect.
You obviously do not want:
Login
 ↓
401
 ↓
Refresh token
Exclude authentication endpoints.
For example:
bool shouldSkipRefresh(
  RequestOptions options,
) {
  const excludedPaths = {
    '/auth/login',
    '/auth/register',
    '/auth/refresh',
    '/auth/forgot-password',
  };

  return excludedPaths.contains(
    options.path,
  );
}
Then:
if (shouldSkipRefresh(
  err.requestOptions,
)) {
  return handler.next(err);
}
Better Approach: Mark Requests That Require Authentication
Instead of maintaining a growing list of excluded endpoints, you can mark requests.
For example:
Options(
  extra: {
    'requiresAuth': false,
  },
)
Then your interceptor can check:
final requiresAuth =
    options.extra['requiresAuth'] != false;
Only attach tokens when authentication is required.
This is particularly useful in large applications containing many public and private APIs.
Handling File Upload Retries
Retrying ordinary GET requests is relatively straightforward.
File uploads require more care.
For example:
final formData = FormData.fromMap({
  'image': await MultipartFile.fromFile(
    imagePath,
  ),
});
Some request bodies or streams cannot always be safely reused after they have already been consumed.
Therefore, if your application performs large multipart uploads, design the API layer so the request body can be reconstructed before retrying.
Do not assume every failed request is automatically replayable.
Handling POST Requests
You should also consider whether a failed POST request is safe to retry.
Imagine:
POST /orders
The server successfully creates the order but the client fails to receive the response because of a network issue.
Blindly retrying could potentially create:
Order 1
Order 2
Token-expiration retries are usually safer when the server rejected the request before processing it, but robust APIs should still consider idempotency for sensitive operations such as:
- Payments
- Orders
- Bookings
- Transfers
- Subscription creation
For critical APIs, coordinate retry behavior with the backend.
Keep Refresh Logic Out of Screens
Avoid doing this:
try {
  await getProfile();
} catch (e) {
  if (e == 401) {
    await refreshToken();
    await getProfile();
  }
}
inside every screen or controller.
Otherwise, you will repeat authentication logic across:
ProfileController
HomeController
OrderController
NotificationController
SettingsController
Centralize it in your API/authentication layer.
GetX Architecture Example
If your Flutter application uses GetX, a practical flow might be:
UI
 ↓
GetX Controller
 ↓
Repository
 ↓
Remote Data Source
 ↓
Dio
 ↓
AuthInterceptor
 ↓
Backend
Token refresh happens below the controller.
Therefore, your controller remains simple:
Future<void> getProfile() async {
  try {
    isLoading.value = true;

    profile.value =
        await repository.getProfile();
  } finally {
    isLoading.value = false;
  }
}
The controller does not need to know whether the access token expired during the request.
Full Authentication Flow
A production Flutter authentication system may look like:
                 LOGIN
                   ↓
             Login Request
                   ↓
               Backend
                   ↓
        Access + Refresh Token
                   ↓
             Secure Storage
                   ↓
             Authenticated
                   ↓
              API Request
                   ↓
        Add Bearer Access Token
                   ↓
              Backend
              ↙     ↘
           200       401
            ↓         ↓
        Response   Refresh Token
                      ↓
                  Backend
                  ↙     ↘
               Success  Failure
                  ↓       ↓
             Save Tokens Clear Session
                  ↓       ↓
            Retry Request Login
                  ↓
               Response
This entire process can happen without individual feature screens implementing refresh logic.
Common Mistakes
Several token-refresh implementations work during basic testing but fail under real application usage.
Refreshing from every API method
Avoid:
if (statusCode == 401) {
  refreshToken();
}
inside every repository or controller.
Use centralized networking logic.
Sending multiple refresh requests
If several requests fail simultaneously, share one refresh operation.
Refreshing the refresh request
Never allow the refresh endpoint to recursively trigger itself.
Retrying forever
Mark retried requests and limit retries.
Ignoring refresh-token rotation
If the backend returns a new refresh token, save it.
Logging tokens
Avoid:
print(accessToken);
print(refreshToken);
especially in production logs.
Tokens are credentials.
Assuming every 401 means expiration
Use backend-specific error codes when available.
Keeping tokens only in memory
If the application restarts, the user may unexpectedly lose the session.
Use appropriate secure persistence when persistent login is required.
Mixing navigation with networking
Prefer notifying your session/authentication layer instead of making the HTTP interceptor responsible for application navigation.
Recommended Production Architecture
For a scalable Flutter project:
lib/
├── core/
│   ├── api/
│   │   ├── api_client.dart
│   │   ├── api_endpoints.dart
│   │   └── auth_interceptor.dart
│   │
│   ├── storage/
│   │   └── token_storage.dart
│   │
│   └── session/
│       └── session_manager.dart
│
└── features/
    └── auth/
        ├── data/
        │   ├── dto/
        │   │   ├── login_request_dto.dart
        │   │   ├── login_response_dto.dart
        │   │   └── refresh_token_dto.dart
        │   │
        │   ├── data_sources/
        │   │   └── auth_remote_data_source.dart
        │   │
        │   └── repositories/
        │       └── auth_repository_impl.dart
        │
        ├── domain/
        │   ├── entities/
        │   │   └── auth_session_entity.dart
        │   └── repositories/
        │       └── auth_repository.dart
        │
        └── presentation/
            ├── controllers/
            │   └── auth_controller.dart
            ├── screens/
            └── widgets/
This keeps networking, authentication, storage, business logic, and UI responsibilities separated.
Token Refresh Best Practices
For most production Flutter applications, follow these principles:
- Keep access tokens short-lived according to your backend security design.
- Store sensitive persistent credentials using appropriate secure storage.
- Add access tokens centrally with a Dio interceptor.
- Detect authentication failures in the networking layer.
- Use a dedicated refresh request path or Dio instance.
- Allow only one refresh operation at a time.
- Make concurrent failed requests wait for that refresh.
- Save rotated refresh tokens immediately.
- Retry an eligible failed request only once.
- Clear the session when refresh authentication genuinely fails.
- Avoid printing tokens in logs.
- Do not blindly retry non-idempotent or non-replayable requests.
- Keep token-refresh logic out of Flutter widgets.
- Treat client-side JWT expiration checks as an optimization, not authentication validation.
Should You Use Dio QueuedInterceptorsWrapper?
Dio also provides mechanisms for controlling interceptor execution order.
For authentication-heavy applications, queued interceptor behavior can be useful because asynchronous requests may otherwise enter interceptors concurrently.
However, simply queueing every request is not always the best solution.
You generally want to prevent duplicate refresh operations, not unnecessarily serialize all network traffic.
A shared refresh Future, mutex-style mechanism, or carefully designed queued authentication interceptor can solve the refresh race while allowing normal API requests to remain concurrent.
Access Token Refresh vs Forced Login
The final decision should depend on whether the refresh token is still valid.
Access Token Expired
        ↓
Refresh Token Valid?
      ↙       ↘
    Yes        No
     ↓          ↓
Get New      Clear Tokens
Access Token     ↓
     ↓        Login Screen
Retry Request
An expired access token is a normal authentication event.
An invalid or expired refresh token usually means the current session can no longer be renewed and the user needs to authenticate again.
Final Thoughts
Refreshing expired tokens in Flutter is more than simply checking for a 401 response and calling another endpoint.
A reliable implementation needs to handle:
Access token injection
        +
401 detection
        +
Refresh-token request
        +
Concurrent requests
        +
Refresh-token rotation
        +
Request retry
        +
Infinite-loop prevention
        +
Session expiration
For Flutter applications using Dio, a strong architecture is:
Flutter UI
    ↓
Controller / State Management
    ↓
Repository
    ↓
API Client
    ↓
Dio Auth Interceptor
    ↓
Backend
When the access token expires:
API → 401
      ↓
Single Refresh Request
      ↓
New Access Token
      ↓
Securely Save Token
      ↓
Retry Original Request
      ↓
Continue Normally
The most important principle is to centralize authentication behavior.
Your screens, widgets, and feature controllers should not need to know when an access token expires. Once token refresh is handled correctly at the networking and session layers, the rest of your Flutter application can continue making API requests normally while authentication is renewed transparently in the background.