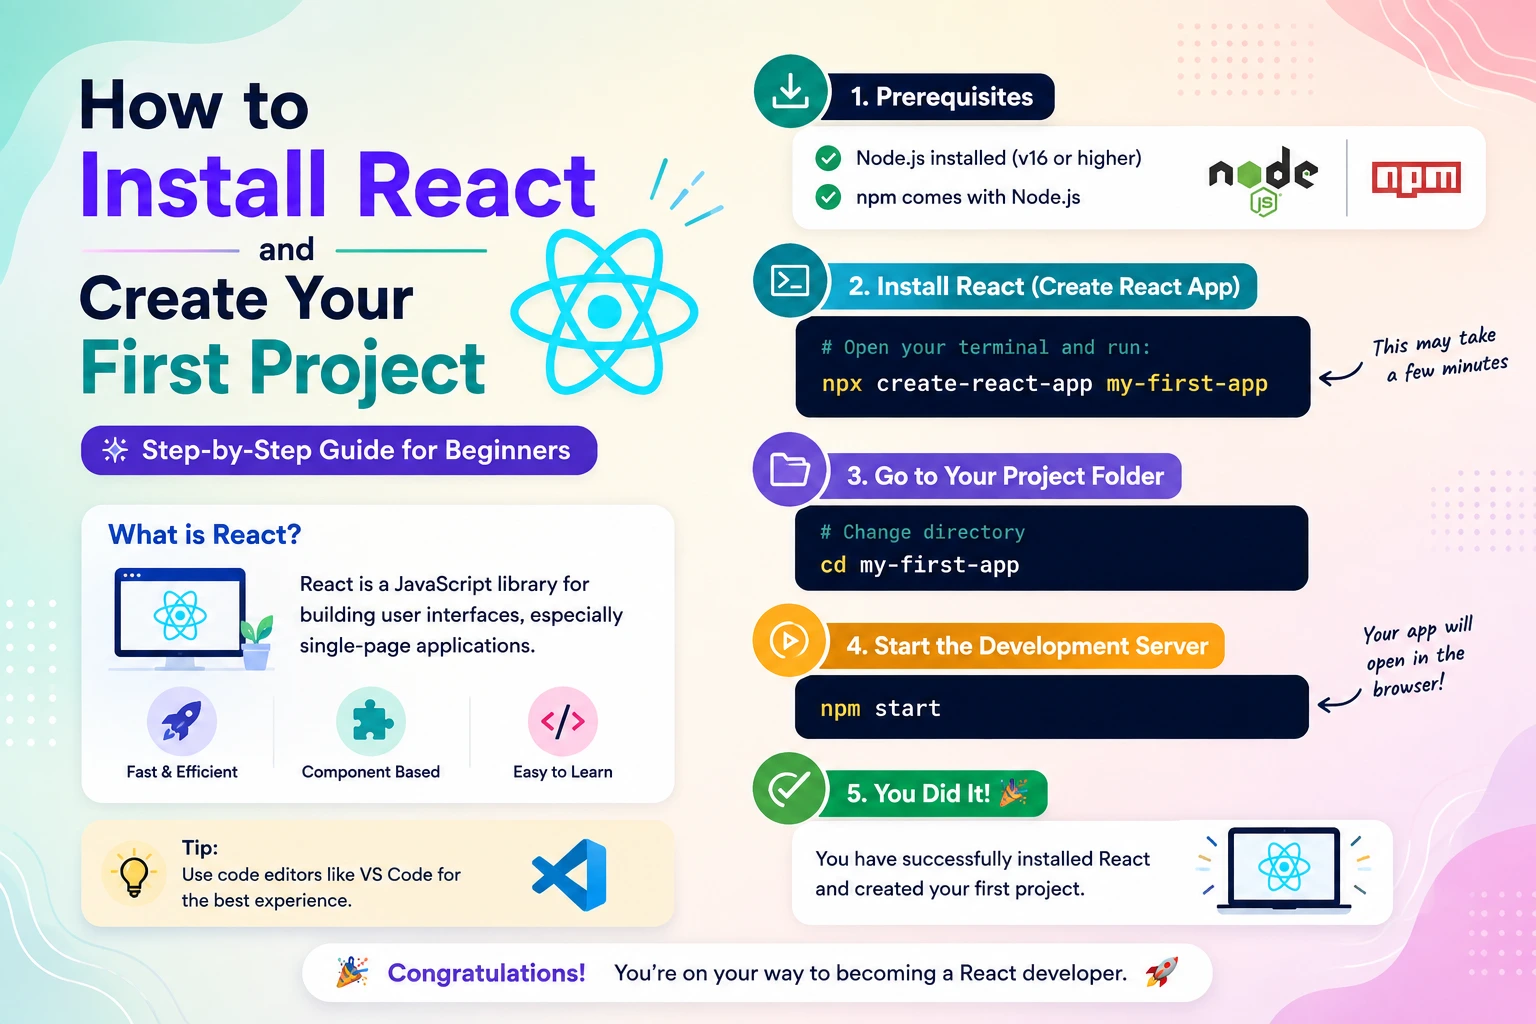
If you are learning React, one of the first practical steps is creating your own React project and running it in the browser.
Reading about React concepts such as components, JSX, props, and state is useful, but building a real project is where everything starts to make sense.
In this guide, you will learn how to install everything required for React, create your first React project, understand the project structure, run the development server, modify your first component, and create a production build.
By the end of this tutorial, you will have a working React application running on your computer.
What Do You Need to Install React?
Before creating a React project, you need a few basic tools.
You will need:
- Node.js
- npm
- A code editor
- A web browser
- Basic JavaScript knowledge
- A terminal or command prompt
The most important requirement is Node.js because React development tools use Node.js and its package manager.
What Is Node.js?
Node.js allows JavaScript to run outside the web browser.
Normally, JavaScript runs inside browsers such as Chrome, Firefox, Safari, or Edge.
Node.js provides a JavaScript runtime that can run JavaScript on your computer.
React development tools use Node.js for tasks such as:
- Creating projects
- Installing packages
- Running development servers
- Building applications
- Managing dependencies
You do not use Node.js to replace React. Instead, Node.js provides the environment needed by many React development tools.
What Is npm?
npm stands for Node Package Manager.
It is installed alongside Node.js in most standard Node.js installations.
npm allows you to:
- Install packages
- Update packages
- Manage dependencies
- Run project scripts
- Share JavaScript packages
For example:
npm install
installs the dependencies defined by a project’s configuration.
You will use npm frequently when working with React.
Step 1: Install Node.js
The first step is installing Node.js on your computer.
Visit the official Node.js website and download a suitable current version.
After installing Node.js, open your terminal.
On macOS or Linux, you can open Terminal.
On Windows, you can use:
- Command Prompt
- PowerShell
- Windows Terminal
Check whether Node.js was installed correctly:
node -v
You should see a version number.
For example:
v22.x.x
The exact version will depend on the current Node.js release installed on your computer.
Now check npm:
npm -v
You should also receive an npm version number.
If both commands work, your Node.js installation is ready.
Step 2: Install a Code Editor
You need a code editor to write React code.
One of the most popular choices is Visual Studio Code.
You can also use other editors if you prefer.
A good code editor should provide:
- JavaScript support
- JSX syntax highlighting
- Auto-completion
- Error detection
- Terminal integration
- Extensions
- Git integration
For beginners, Visual Studio Code is a convenient option.
Step 3: Open Your Terminal
Now open your terminal.
You need to decide where you want to create your React projects.
For example, you might create a development folder:
mkdir projects
Then enter it:
cd projects
You can check your current location using:
pwd
on macOS/Linux.
On Windows, you can use:
cd
Step 4: Create Your First React Project
One of the common modern ways to start a React project is using Vite.
Run:
npm create vite@latest
The command will guide you through project creation.
You will be asked for a project name.
For example:
Project name: my-first-react-app
Enter:
my-first-react-app
Then choose:
Framework: React
Next, select your preferred language option.
For beginners, you can choose:
JavaScript
Your project will then be created.
Step 5: Open the Project Folder
Move into your newly created project:
cd my-first-react-app
Your terminal should now be inside the React project directory.
Step 6: Install Dependencies
Run:
npm install
This command reads the project’s package configuration and installs the required dependencies.
A node_modules directory will be created.
You generally should not manually edit or upload the node_modules folder.
It can be recreated by running:
npm install
Step 7: Start Your React Development Server
Now run:
npm run dev
Vite will start the development server.
The terminal will display a local URL similar to:
Local: http://localhost:5173/
Open that address in your browser.
You should now see your React application.
Congratulations!
You have created and launched your first React project.
Understanding What Just Happened
You might wonder what happened behind the scenes.
The process was:
npm create vite@latest
        ↓
Project Created
        ↓
React Selected
        ↓
npm install
        ↓
Dependencies Installed
        ↓
npm run dev
        ↓
Development Server Started
        ↓
Browser Opens React App
This is the basic workflow you will use repeatedly while learning React.
Step 8: Open Your Project in VS Code
If you use Visual Studio Code, open the project from the terminal:
code .
If the code command is configured correctly, VS Code will open the current project.
You can also open VS Code manually and select the project folder.
Your project might look similar to:
my-first-react-app/
│
├── public/
├── src/
│   ├── assets/
│   ├── App.css
│   ├── App.jsx
│   ├── index.css
│   └── main.jsx
│
├── .gitignore
├── index.html
├── package.json
├── package-lock.json
└── vite.config.js
The exact files can vary depending on the selected template and current tooling.
Understanding the React Project Structure
Let’s understand the important files.
src Folder
The src directory contains most of your application source code.
For example:
src/
├── App.jsx
├── main.jsx
├── index.css
└── assets/
As your application grows, you can create additional folders such as:
src/
├── components/
├── pages/
├── hooks/
├── services/
├── utils/
├── assets/
├── App.jsx
└── main.jsx
What Is main.jsx?
main.jsx is commonly the entry point that connects your React application to the HTML page.
A typical version looks similar to:
import { StrictMode } from "react";
import { createRoot } from "react-dom/client";
import App from "./App.jsx";

createRoot(document.getElementById("root")).render(
  <StrictMode>
    <App />
  </StrictMode>
);
Let’s understand the important part.
This:
document.getElementById("root")
finds the HTML element where React should render the application.
Then:
<App />
renders your main React component.
What Is App.jsx?
App.jsx is commonly the main application component in a small React project.
You might initially see starter code here.
You can replace it with something simple.
For example:
function App() {
  return (
    <div>
      <h1>Hello React!</h1>
      <p>Welcome to my first React project.</p>
    </div>
  );
}

export default App;
Save the file.
Your browser should automatically update.
This feature is commonly referred to as Hot Module Replacement (HMR).
Your First React Component
Let’s create a simple component.
function Welcome() {
  return <h1>Welcome to React!</h1>;
}

export default Welcome;
You could place it inside:
src/components/Welcome.jsx
Then import it into App.jsx:
import Welcome from "./components/Welcome";

function App() {
  return (
    <div>
      <Welcome />
    </div>
  );
}

export default App;
Now your application uses a separate reusable component.
What Is a Component?
A React component is a reusable part of your user interface.
For example, a website could contain:
App
│
├── Header
├── Navbar
├── Sidebar
├── ProductCard
├── Button
└── Footer
Instead of putting everything into one large file, you can create separate components.
This makes your application easier to understand and maintain.
Creating a Button Component
Create:
src/components/Button.jsx
Add:
function Button() {
  return <button>Click Me</button>;
}

export default Button;
Then use it inside App.jsx:
import Button from "./components/Button";

function App() {
  return (
    <div>
      <h1>My React App</h1>
      <Button />
    </div>
  );
}

export default App;
Your page now contains a reusable button component.
Using Props
You can make the button reusable by passing a value through props.
function Button({ text }) {
  return <button>{text}</button>;
}

export default Button;
Then:
<Button text="Login" />
<Button text="Register" />
<Button text="Buy Now" />
The same component can now display different text.
This is one of the fundamental ideas behind React.
Adding State to Your First Project
React applications often need data that changes.
For example:
- Counter
- Form input
- Login status
- Shopping cart
- Menu visibility
React provides the useState Hook for this.
Example:
import { useState } from "react";

function App() {
  const [count, setCount] = useState(0);

  return (
    <div>
      <h1>Counter App</h1>

      <p>Count: {count}</p>

      <button onClick={() => setCount(count + 1)}>
        Increase
      </button>
    </div>
  );
}

export default App;
Now every time you click the button, the counter increases.
Understanding useState
This line:
const [count, setCount] = useState(0);
creates two things:
count
stores the current state value.
And:
setCount
updates the state.
The initial value is:
0
When you call:
setCount(count + 1)
React updates the state and renders the updated UI.
Adding CSS to Your React Project
React does not replace CSS.
You can continue using CSS to style your application.
For example:
.app {
  max-width: 800px;
  margin: 0 auto;
  padding: 40px;
}
Then:
function App() {
  return (
    <div className="app">
      <h1>Hello React</h1>
    </div>
  );
}
Notice that React uses:
className
instead of:
class
when using JSX.
Creating a Simple First React Project
Now let’s combine the concepts into a small application.
The application will display:
- A heading
- A description
- A counter
- A button
Example:
import { useState } from "react";

function App() {
  const [count, setCount] = useState(0);

  return (
    <main>
      <h1>My First React App</h1>

      <p>
        I am learning React by building my first application.
      </p>

      <h2>Count: {count}</h2>

      <button onClick={() => setCount(count + 1)}>
        Increase Count
      </button>
    </main>
  );
}

export default App;
This small application already demonstrates several important React concepts:
- Components
- JSX
- State
- Events
- JavaScript expressions
- Rendering
How to Stop the Development Server
When you run:
npm run dev
the development server continues running in your terminal.
To stop it, press:
Ctrl + C
You can start it again whenever you need:
npm run dev
How to Build a React Project for Production
When your application is ready for deployment, you normally create a production build.
Run:
npm run build
This creates an optimized production build, commonly inside:
dist/
The production build is designed to be deployed to a suitable hosting service.
You can preview the production build locally with:
npm run preview
What Is the dist Folder?
The dist folder contains the generated production files.
For example:
dist/
├── assets/
├── index.html
└── ...
These are the files that can be served by a compatible static web host or other deployment infrastructure.
You generally do not manually edit the generated dist files.
Instead, modify your source code and build the application again.
Common React Commands
Here are some commands you will frequently use.
Create a React project
npm create vite@latest
Enter the project
cd my-first-react-app
Install dependencies
npm install
Start development server
npm run dev
Create production build
npm run build
Preview production build
npm run preview
Common Installation Problems
Beginners sometimes encounter errors while setting up React.
Let’s look at some common problems.
Problem 1: node Command Not Found
If you run:
node -v
and receive an error such as:
command not found
Node.js may not be installed correctly or may not be available in your system PATH.
Install Node.js and restart your terminal.
Problem 2: npm Command Not Found
If:
npm -v
does not work, check your Node.js installation.
npm normally comes with Node.js.
Problem 3: Port Already in Use
Sometimes another application is already using the development server’s port.
Vite can normally select another available port.
You may see something like:
Port 5173 is in use, trying another one...
This is not necessarily a serious error.
Problem 4: Dependencies Are Missing
If your project reports missing dependencies, run:
npm install
Then start the development server again:
npm run dev
Should You Use JavaScript or TypeScript?
When creating a React project, you may have the option to choose JavaScript or TypeScript.
Choose JavaScript if:
- You are completely new to React
- You are still learning JavaScript
- You want a simpler starting point
Choose TypeScript if:
- You already know JavaScript
- You want static typing
- You are working on a larger application
- You want stronger tooling and type checking
For an absolute beginner, JavaScript is usually the easier starting point.
Once you understand React, learning React with TypeScript becomes much easier.
What Should You Learn After Creating Your First React Project?
Creating the project is only the beginning.
A good next learning sequence is:
1. JSX
Learn how JSX works.
2. Components
Learn how to create reusable components.
3. Props
Learn how to pass data between components.
4. State
Learn how components manage changing data.
5. Events
Learn how to handle clicks, input changes, and form submissions.
6. Conditional Rendering
Learn how to show different UI based on conditions.
7. Lists
Learn how to render arrays of data.
8. Hooks
Start with:
useState
useEffect
useContext
useRef
9. Forms
Learn controlled inputs and form handling.
10. API Integration
Learn how to retrieve data from APIs.
11. Routing
Learn how to create multiple application routes.
12. State Management
Understand when React’s built-in state is enough and when a dedicated state-management solution may be useful.
Build Projects Instead of Only Watching Tutorials
One of the biggest mistakes beginners make is watching React tutorials without building anything.
After creating your first project, start building small applications.
A good progression is:
Counter
   ↓
Todo App
   ↓
Calculator
   ↓
Weather App
   ↓
Notes App
   ↓
Blog
   ↓
E-Commerce App
   ↓
Admin Dashboard
Each project teaches new concepts.
Recommended First React Project: Todo App
A Todo application is particularly useful for beginners because it teaches:
- Components
- State
- Forms
- Events
- Lists
- Conditional rendering
- Adding items
- Removing items
- Updating items
A simple structure could be:
Todo App
│
├── Header
├── TodoForm
├── TodoList
│   └── TodoItem
└── Footer
This is much closer to how real applications are structured than a simple counter.
React Development Workflow for Beginners
Once you start building projects, your normal workflow may look like this:
Open Project
    ↓
npm install
    ↓
npm run dev
    ↓
Write React Code
    ↓
Save Changes
    ↓
Browser Updates
    ↓
Test Application
    ↓
Fix Errors
    ↓
Build Production Version
    ↓
Deploy
Understanding this workflow will make React development much more comfortable.
Important Tips for React Beginners
Learn JavaScript First
Do not skip JavaScript fundamentals.
Start Small
Your first project does not need to be a complete e-commerce application.
Understand Every Line
Avoid blindly copying code from tutorials.
Use Components
If a piece of UI can logically be reused, consider making it a component.
Keep Components Focused
Avoid creating extremely large components.
Practice Regularly
Building projects is more valuable than memorizing syntax.
Learn Debugging
Errors are a normal part of development.
Learn how to read:
- Browser console errors
- Terminal errors
- React warnings
- Network errors
Frequently Asked Questions
Can I install React without Node.js?
For modern local React development, Node.js is commonly used for project tooling and package management. Installing Node.js is the simplest setup for beginners.
Do I need VS Code to use React?
No.
You can use any suitable code editor.
VS Code is simply a popular choice.
Is Vite React?
No.
React and Vite are different technologies.
React is the UI library.
Vite is a development/build tool that can be used to create and run modern frontend projects.
A simple way to understand the relationship is:
React
+
Vite
+
Node.js/npm
↓
React Development Environment
What command starts a React project?
For a Vite-based project, the development server is commonly started with:
npm run dev
What command creates a production build?
Use:
npm run build
Where should I write my React code?
Most of your application code will be inside:
src/
For example:
src/
├── components/
├── pages/
├── App.jsx
└── main.jsx
Can I use React on Windows?
Yes.
React development works on Windows.
You can use:
- PowerShell
- Command Prompt
- Windows Terminal
- VS Code terminal
Can I use React on macOS?
Yes.
macOS is widely used for web development.
You can use Terminal, VS Code, and Node.js to create React projects.
Can I use React on Linux?
Yes.
React development works on common Linux distributions as well.
Final Conclusion
Installing React and creating your first project is much easier once you understand the basic development workflow.
The important steps are:
Install Node.js
      ↓
Verify Node and npm
      ↓
Create React Project
      ↓
Choose React
      ↓
Choose JavaScript or TypeScript
      ↓
Enter Project Folder
      ↓
npm install
      ↓
npm run dev
      ↓
Open Application in Browser
Once your application is running, start experimenting.
Change the heading.
Create a new component.
Add a button.
Add state.
Create a form.
Build a Todo application.
The goal is not simply to know how to run:
npm run dev
The real goal is to understand how React applications are structured and how components, JSX, props, state, events, and hooks work together.
If you are completely new to React, this is a great point to start building your first real project and gradually move from beginner-level applications to production-ready React applications.