Deploying applications manually can be time-consuming, especially when development teams need to build Docker images, test changes, push images to a registry, and deploy new versions regularly.
Docker makes application deployment more consistent by packaging an application and its dependencies into containers. However, manually managing the Docker build and deployment process can still introduce errors and unnecessary delays.
By combining Docker with CI/CD automation, development teams can automatically build, test, publish, and deploy applications whenever code changes are pushed to a repository.
In this guide, we’ll explore how Docker build and deployment automation works, the benefits of automation, common workflows, and best practices for creating a reliable deployment pipeline.
What Is Docker Build and Deployment Automation?
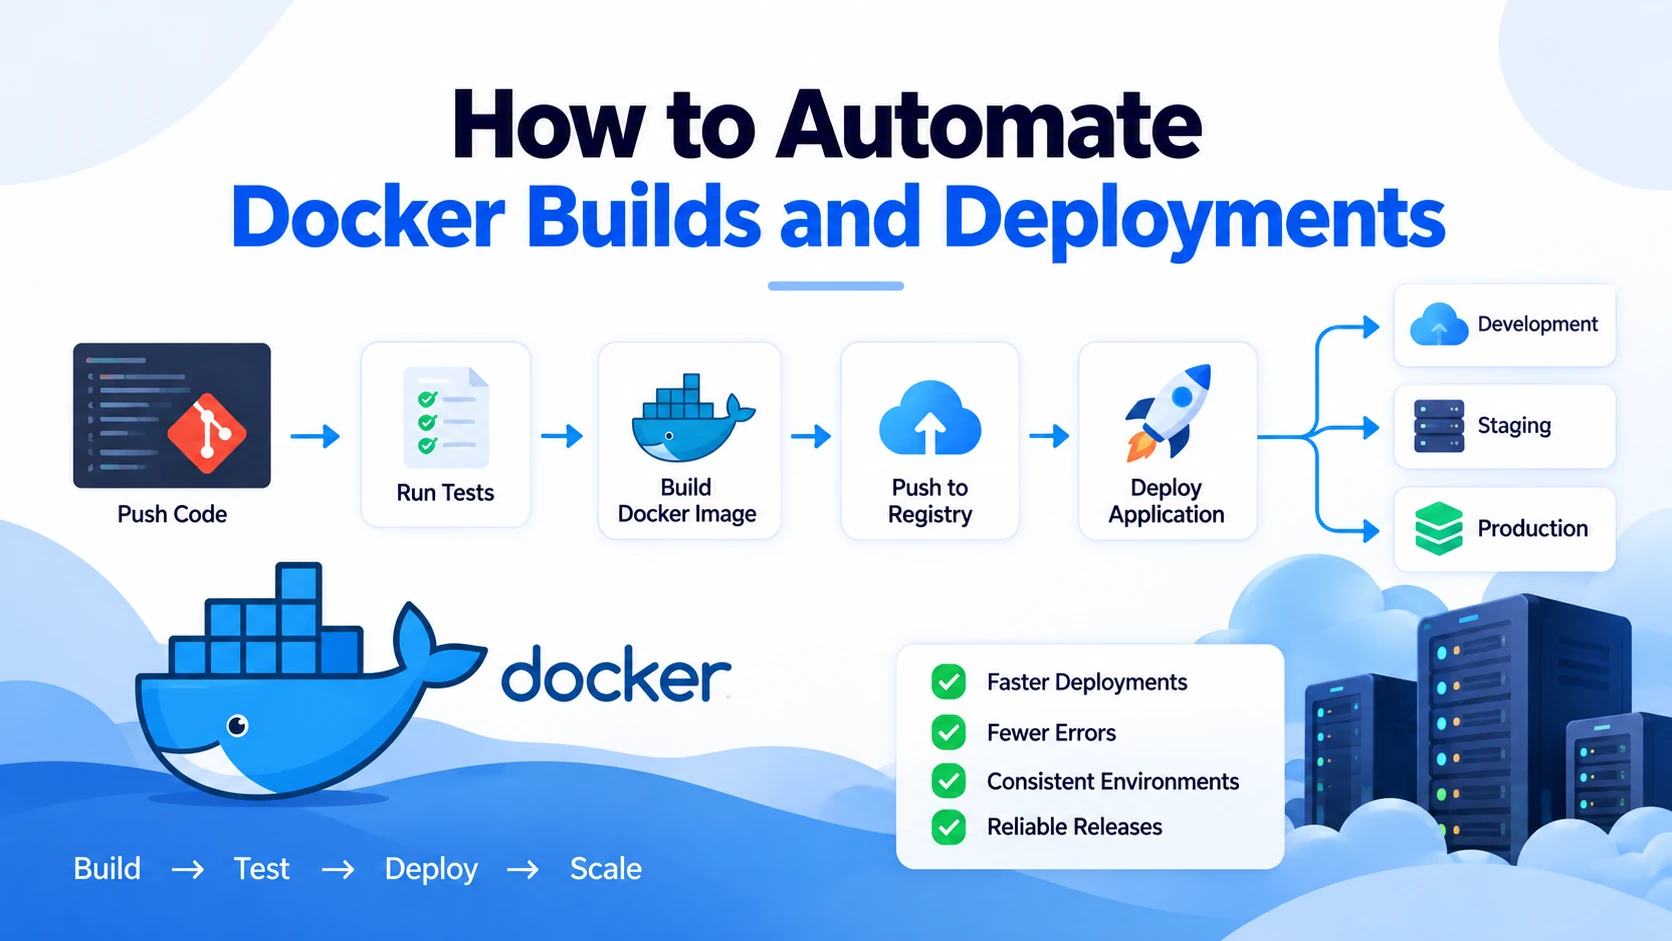
Docker build and deployment automation is the process of automatically creating Docker images, testing them, pushing them to a container registry, and deploying them to a target environment.
A typical automated workflow looks like this:
Developer pushes code → CI/CD pipeline starts → Docker image is built → Tests run → Image is pushed → Application is deployed
Instead of manually running Docker commands after every code change, the CI/CD system handles these repetitive tasks automatically.
This approach is especially useful for teams that deploy applications frequently.
Why Automate Docker Builds and Deployments?
1. Faster Deployments
Manual deployments require developers to perform multiple steps.
For example:
- Pull the latest code
- Build the Docker image
- Run tests
- Tag the image
- Push the image
- Connect to the server
- Pull the new image
- Restart the application
Automation can execute these steps consistently with a single code push.
2. Fewer Human Errors
Manual deployments can lead to mistakes such as:
- Using the wrong image tag
- Deploying an outdated image
- Forgetting to run tests
- Pushing to the wrong registry
- Using incorrect environment variables
An automated pipeline follows predefined steps every time.
3. Consistent Environments
Docker packages applications with their dependencies, helping ensure that the same image can be used across development, staging, and production environments.
This reduces the common problem of:
“It works on my machine.”
4. Faster Feedback
Automated tests can run immediately after a developer pushes code.
If a change breaks the application, the CI/CD pipeline can fail before the code reaches production.
5. Easier Rollbacks
When Docker images are tagged with specific versions or commit identifiers, teams can quickly return to a previous working image if a deployment causes problems.
How an Automated Docker Deployment Pipeline Works
A typical Docker CI/CD pipeline contains several stages.
Step 1: Developer Pushes Code
The process begins when a developer pushes code to a Git repository.
For example:
git push origin main
The CI/CD platform detects the change and automatically starts the workflow.
Depending on the project, the pipeline may run for:
- Every push
- Pull requests
- Specific branches
- Release tags
- Scheduled deployments
Step 2: Install Dependencies
The pipeline prepares the environment required to build and test the application.
For a Node.js application, this could involve installing npm dependencies.
For a Python application, the pipeline may install packages from requirements.txt.
The exact process depends on the application’s technology stack.
Step 3: Run Automated Tests
Before creating a production image, the pipeline should run automated tests.
These can include:
- Unit tests
- Integration tests
- API tests
- Linting
- Type checking
- Security checks
If the tests fail, the pipeline should stop.
This prevents broken code from automatically reaching production.
Step 4: Build the Docker Image
After successful tests, the pipeline builds the Docker image.
A basic command might look like:
docker build -t my-app:latest .
The Dockerfile defines how the application is packaged.
A simple Dockerfile might contain:
FROM node:22-alpine

WORKDIR /app

COPY package*.json ./

RUN npm ci

COPY . .

RUN npm run build

EXPOSE 3000

CMD ["npm", "start"]
The pipeline can automatically execute the Docker build whenever the application changes.
Step 5: Tag the Docker Image
Instead of relying only on the latest tag, it is generally better to use a unique version or commit-based tag.
For example:
my-app:8f32a91
The tag could represent the Git commit that created the image.
This makes it easier to identify exactly which version is running in each environment.
Step 6: Push the Image to a Container Registry
Once the image has been successfully built, it can be pushed to a container registry.
Examples include:
- Docker Hub
- GitHub Container Registry
- Amazon Elastic Container Registry
- Google Artifact Registry
- Azure Container Registry
The workflow might look like:
docker login
docker push my-app:8f32a91
The deployment environment can then pull the specific image version from the registry.
Step 7: Deploy the New Image
After the image is available in the registry, the pipeline can deploy it.
The deployment method depends on the infrastructure being used.
For a simple Docker server, the process might look like:
docker pull my-app:8f32a91
docker stop my-app
docker rm my-app
docker run -d --name my-app my-app:8f32a91
For more advanced environments, Docker images can be deployed using container orchestration platforms such as Kubernetes.
The important principle is that the deployment process should use the image produced by the pipeline rather than rebuilding the application directly on the production server.
Using GitHub Actions for Docker Automation
GitHub Actions is one popular way to automate Docker builds and deployments.
A workflow can be triggered whenever code is pushed to the main branch.
A simplified workflow could look like:
name: Build and Deploy

on:
  push:
    branches:
      - main

jobs:
  build:
    runs-on: ubuntu-latest

    steps:
      - name: Checkout code
        uses: actions/checkout@v4

      - name: Build Docker image
        run: docker build -t my-app:${{ github.sha }} .

      - name: Run tests
        run: docker run --rm my-app:${{ github.sha }} npm test
In a production workflow, additional steps can authenticate with a container registry, push the image, and deploy it to the target infrastructure.
Automating Different Deployment Environments
Most professional applications have multiple environments.
A common setup is:
Development → Staging → Production
Docker automation can support this workflow.
Development
Developers build and test the application locally.
Staging
A successful CI pipeline automatically deploys the Docker image to a staging environment.
The team can then perform additional testing.
Production
After approval, the same tested Docker image can be deployed to production.
This is important because production should ideally use the same image artifact that was tested in staging.
Docker Deployment Strategies
Different applications may require different deployment strategies.
Rolling Deployment
A rolling deployment gradually replaces old application instances with new ones.
This can reduce downtime because the old version remains available while the new version is being deployed.
Blue-Green Deployment
Two environments are maintained:
Blue → Current production
Green → New version
After the new version is tested, traffic can be switched from Blue to Green.
If something goes wrong, traffic can be switched back.
Canary Deployment
A new version is initially deployed to a small percentage of users.
For example:
95% → Old version
5% → New version
If the new version performs well, traffic can gradually increase.
This reduces the risk of deploying a major change to every user at once.
Add Security Checks to the Docker Pipeline
Automation should not only focus on speed. Security should also be part of the pipeline.
Before deploying an image, consider checking:
- Vulnerable dependencies
- Outdated base images
- Exposed secrets
- Container configuration
- Known image vulnerabilities
Never store sensitive credentials directly inside a Dockerfile.
For example, avoid:
ENV DATABASE_PASSWORD=my-password
Instead, use your CI/CD platform’s secret management and inject credentials securely during deployment.
Best Practices for Automated Docker Deployments
Use Small Docker Images
Smaller images generally mean:
- Faster builds
- Faster downloads
- Smaller attack surfaces
- Less storage usage
Multi-stage Docker builds can help keep production images smaller by separating build dependencies from runtime dependencies.
Use Specific Image Tags
Avoid depending exclusively on:
latest
Use version numbers, Git commit hashes, or release identifiers.
For example:
my-app:1.4.2
or:
my-app:8f32a91
This makes deployments easier to track and roll back.
Cache Docker Layers
Docker builds can become significantly faster when reusable layers are cached correctly.
Place instructions that change less frequently earlier in the Dockerfile and frequently changing application code later.
Keep CI and Deployment Separate
A useful pipeline structure is:
Build → Test → Security Scan → Push → Deploy
This makes failures easier to identify and allows teams to introduce approval gates before production deployments.
Monitor Deployments
A deployment is not complete simply because the Docker container started successfully.
Monitor:
- Application health
- CPU usage
- Memory usage
- Error rates
- Response times
- Container restarts
- Logs
Health checks can also help determine whether the new application version is actually ready to receive traffic.
Example End-to-End Docker Automation Workflow
A production workflow could look like this:
Developer pushes code
        ↓
CI/CD pipeline starts
        ↓
Checkout repository
        ↓
Install dependencies
        ↓
Run tests
        ↓
Build Docker image
        ↓
Run security checks
        ↓
Tag image with commit SHA
        ↓
Push image to registry
        ↓
Deploy to staging
        ↓
Run deployment checks
        ↓
Approve production deployment
        ↓
Deploy same image to production
        ↓
Monitor application
If any critical step fails, the pipeline can stop automatically.
This creates a repeatable and controlled deployment process.
Docker Automation vs Manual Deployment
| Feature | Manual Deployment | Automated Deployment |
|---|---|---|
| Docker build | Manual | Automated |
| Testing | Manual/variable | Automated |
| Image tagging | Manual | Automated |
| Registry push | Manual | Automated |
| Deployment | Manual | Automated |
| Error detection | Often delayed | Early |
| Rollback | Manual | Easier |
| Consistency | Lower | Higher |
| Deployment speed | Slower | Faster |
| Scalability | Limited | High |
Common Mistakes to Avoid
Using latest Everywhere
Using only the latest tag makes it difficult to determine exactly which version is deployed.
Skipping Tests
Automatically deploying every code change without testing can quickly introduce production problems.
Building Directly on Production
Production servers should ideally pull a tested image rather than building an image from source code during deployment.
Storing Secrets in Images
Passwords, API keys, and tokens should never be hardcoded into Dockerfiles or committed to source control.
No Rollback Strategy
Every deployment pipeline should have a way to return to a previously working version.
Conclusion
Automating Docker builds and deployments can transform application delivery from a repetitive manual process into a reliable CI/CD workflow.
A well-designed pipeline can automatically build Docker images, run tests, perform security checks, push images to a registry, deploy applications, and monitor the result.
The key is to create a predictable workflow where every deployment follows the same process and every Docker image can be traced back to a specific version of the source code.
Whether you’re running a small application on a single server or deploying a large system across cloud infrastructure, Docker combined with CI/CD automation can make deployments faster, more consistent, and easier to manage.