Most Flutter applications depend on APIs to load products, profiles, posts, categories, settings, dashboards, or other dynamic data.
Calling the server every time a screen opens works, but it can create several problems:
- Slower screen loading
- Unnecessary network requests
- Higher API/server usage
- Poor experience on slow networks
- Repeated loading indicators
- Increased mobile data consumption
- No useful data when the device is offline
API caching solves many of these problems by temporarily storing previously fetched data and reusing it when appropriate.
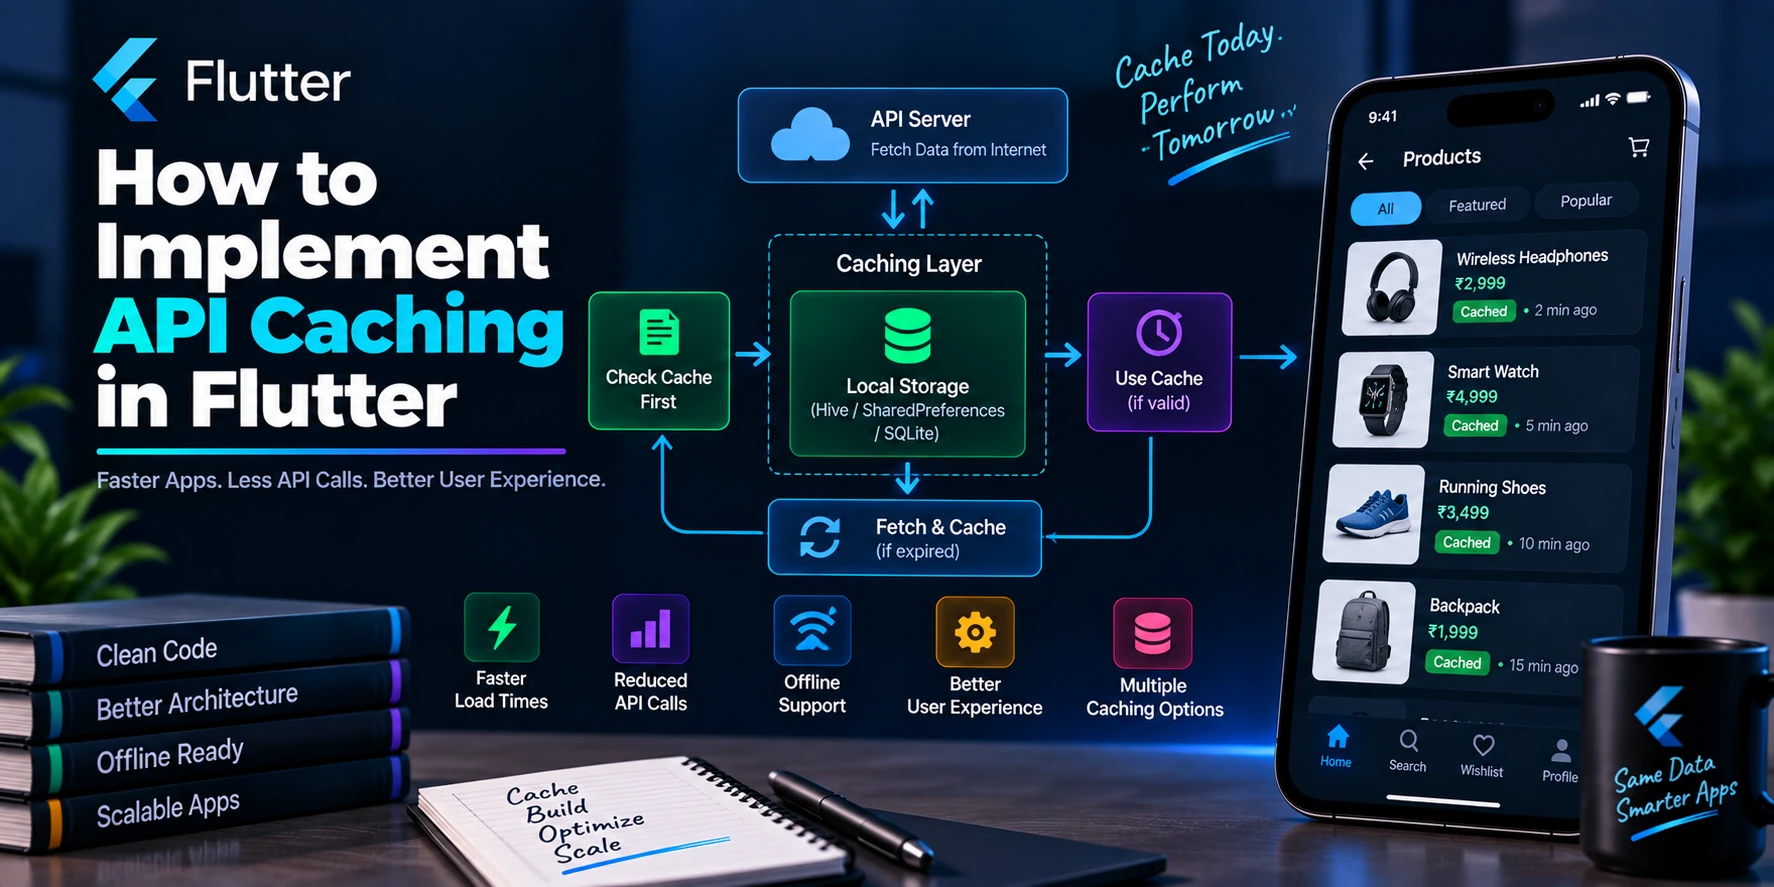
A well-designed Flutter application might follow this flow:
Screen Opens
     ↓
Check Cache
     ↓
Cache Valid?
  ↙        ↘
Yes         No
 ↓           ↓
Return     Call API
Cached        ↓
Data       Save Cache
              ↓
          Return Data
In this guide, we’ll build practical API caching patterns for Flutter using Dio, repositories, memory caching, persistent local caching, expiration rules, and cache invalidation.
What Is API Caching?
API caching means storing data received from an API so that your application does not need to download the same information every time it is requested.
Suppose your application calls:
GET /products
and receives:
{
  "data": [
    {
      "id": 1,
      "name": "Running Shoes",
      "price": 2499
    },
    {
      "id": 2,
      "name": "Sports T-Shirt",
      "price": 999
    }
  ]
}
Without caching:
Open Products
      ↓
GET /products

Go Back

Open Products Again
      ↓
GET /products
The same API may be called repeatedly.
With caching:
First Open
    ↓
GET /products
    ↓
Save Cache

Second Open
    ↓
Read Cache
The second screen load can be almost immediate.
Why API Caching Matters in Flutter
Caching is not only a performance optimization.
It can improve several parts of the user experience.
Faster screen loading
Cached data can often be displayed without waiting for the network.
Reduced network traffic
Repeated requests for unchanged data can be avoided.
Better offline behavior
Persistent cache can allow users to see previously downloaded content even when the network is unavailable.
Reduced backend load
If thousands of users repeatedly request mostly static information, caching can significantly reduce unnecessary requests.
Better perceived performance
Instead of displaying:
Loading...
every time a user returns to a screen, the application can display cached content immediately.
What Data Should You Cache?
Not every API response should be cached.
Good caching candidates include:
Product categories
Country/state/city lists
App configuration
Public profiles
Product lists
Articles
Dashboard summaries
Static content
Frequently viewed pages
Search suggestions
Previously loaded feeds
Data that changes frequently requires more careful caching.
Examples include:
Bank balances
Live stock prices
Chat messages
Real-time location
Payment status
OTP data
Inventory during checkout
Live bidding
Caching strategy should always depend on how fresh the data needs to be.
Types of Caching in Flutter
There are two major forms of client-side API caching.
1. Memory Cache
Memory cache stores data in RAM.
For example:
final Map<String, dynamic> cache = {};
Advantages:
- Extremely fast
- Simple
- No disk access
Disadvantages:
- Lost when the app process ends
- Can consume memory
- Not suitable for offline persistence
2. Persistent Cache
Persistent caching stores data on the device.
Common Flutter storage options include:
- SharedPreferences for small/simple values
- Hive
- Isar
- Drift/SQLite
- Secure storage for sensitive credentials, not general large API caching
Persistent cache survives application restarts.
For example:
API
 ↓
Local Database
 ↓
App Restart
 ↓
Local Database
 ↓
Previously Cached Data
This is especially useful for offline-capable applications.
Memory Cache vs Persistent Cache
| Feature | Memory Cache | Persistent Cache |
|---|---|---|
| Speed | Very fast | Fast |
| Survives restart | No | Yes |
| Offline support | Limited | Yes |
| Implementation | Simple | More complex |
| Storage capacity | RAM-dependent | Disk-dependent |
| Best for | Temporary session data | Longer-lived cache |
Many production applications use both.
Memory Cache
      ↓
Persistent Cache
      ↓
Network
This creates multiple caching layers.
Recommended Project Structure
For a feature-based Flutter project:
lib/
│
├── core/
│   ├── api/
│   │   ├── api_client.dart
│   │   ├── api_endpoints.dart
│   │   └── network_info.dart
│   │
│   ├── cache/
│   │   ├── cache_entry.dart
│   │   ├── cache_manager.dart
│   │   └── cache_keys.dart
│   │
│   ├── error/
│   │   ├── exceptions.dart
│   │   └── failures.dart
│   │
│   └── utils/
│       └── app_constants.dart
│
└── features/
    └── products/
        ├── data/
        │   ├── dto/
        │   │   └── product_dto.dart
        │   │
        │   ├── data_sources/
        │   │   ├── product_remote_data_source.dart
        │   │   └── product_local_data_source.dart
        │   │
        │   └── repositories/
        │       └── product_repository_impl.dart
        │
        ├── domain/
        │   ├── entities/
        │   │   └── product_entity.dart
        │   │
        │   └── repositories/
        │       └── product_repository.dart
        │
        └── presentation/
            ├── controllers/
            │   └── product_controller.dart
            ├── screens/
            │   └── product_screen.dart
            └── widgets/
                └── product_card.dart
The important idea is that caching should usually live in the data layer, not inside widgets.
Basic API Request Without Caching
Suppose we have:
class ProductRemoteDataSource {
  final Dio dio;

  ProductRemoteDataSource(this.dio);

  Future<List<dynamic>> getProducts() async {
    final response = await dio.get(
      '/products',
    );

    return response.data['data'];
  }
}
Every call to:
getProducts();
makes another network request.
Let’s improve it.
Implementing a Simple Memory Cache
Start with a small reusable cache entry.
class CacheEntry<T> {
  final T data;
  final DateTime createdAt;

  CacheEntry({
    required this.data,
    required this.createdAt,
  });
}
Now create a cache manager.
class MemoryCacheManager {
  final Map<String, CacheEntry<dynamic>>
      _cache = {};

  void set<T>(
    String key,
    T data,
  ) {
    _cache[key] = CacheEntry<T>(
      data: data,
      createdAt: DateTime.now(),
    );
  }

  T? get<T>(
    String key, {
    required Duration maxAge,
  }) {
    final entry = _cache[key];

    if (entry == null) {
      return null;
    }

    final age = DateTime.now().difference(
      entry.createdAt,
    );

    if (age > maxAge) {
      _cache.remove(key);

      return null;
    }

    return entry.data as T;
  }

  void remove(String key) {
    _cache.remove(key);
  }

  void clear() {
    _cache.clear();
  }
}
Now we have a reusable in-memory cache.
Using Memory Cache with API Calls
class ProductRepository {
  final Dio dio;
  final MemoryCacheManager cacheManager;

  ProductRepository({
    required this.dio,
    required this.cacheManager,
  });

  Future<List<dynamic>> getProducts() async {
    const cacheKey = 'products';

    final cachedData =
        cacheManager.get<List<dynamic>>(
      cacheKey,
      maxAge: const Duration(minutes: 5),
    );

    if (cachedData != null) {
      return cachedData;
    }

    final response = await dio.get(
      '/products',
    );

    final products =
        response.data['data'] as List<dynamic>;

    cacheManager.set(
      cacheKey,
      products,
    );

    return products;
  }
}
Now:
getProducts()
      ↓
Check Cache
      ↓
Found + Valid?
   ↙       ↘
 Yes        No
  ↓          ↓
Return      API
Cache        ↓
          Save Cache
             ↓
          Return Data
What Is TTL?
TTL means Time To Live.
It determines how long cached data should be considered fresh.
For example:
const Duration(minutes: 5)
means:
0–5 minutes
Cache = Fresh

After 5 minutes
Cache = Expired
TTL is one of the simplest ways to control stale data.
Choosing the Right Cache Duration
There is no universal cache duration.
Different data should use different expiration periods.
For example:
class CacheDuration {
  static const products =
      Duration(minutes: 5);

  static const categories =
      Duration(hours: 6);

  static const profile =
      Duration(minutes: 10);

  static const appConfig =
      Duration(hours: 12);
}
This is better than applying:
5 minutes
to every API.
Cache duration should reflect how frequently the underlying data changes and how costly stale data would be.
Cache Keys Matter
Consider:
GET /products?page=1
GET /products?page=2
If both requests use:
products
as the cache key, page two could overwrite page one.
Instead:
String productsCacheKey({
  required int page,
}) {
  return 'products_page_$page';
}
Now:
products_page_1
products_page_2
products_page_3
are separate cache entries.
Cache Keys with Filters
Suppose your endpoint is:
GET /products?category=shoes&page=1
Your key could be:
String buildProductCacheKey({
  required String category,
  required int page,
}) {
  return 'products_${category}_$page';
}
Result:
products_shoes_1
products_shirts_1
products_shoes_2
Every unique request should map to the appropriate cache entry.
Cache-First Strategy
Cache-first means:
Check Cache
    ↓
Valid?
 ↙      ↘
Yes      No
 ↓        ↓
Return   API
Example:
Future<List<Product>> getProducts() async {
  final cached =
      cache.get<List<Product>>(
    'products',
    maxAge: const Duration(minutes: 10),
  );

  if (cached != null) {
    return cached;
  }

  final products =
      await remoteDataSource.getProducts();

  cache.set(
    'products',
    products,
  );

  return products;
}
This strategy is good when:
- Data does not change constantly
- Fast loading is important
- Some staleness is acceptable
Network-First Strategy
Network-first works differently:
Call API
   ↓
Success?
 ↙      ↘
Yes      No
 ↓        ↓
Save     Cache
Cache    Fallback
 ↓        ↓
Return   Return
Example:
Future<List<Product>> getProducts() async {
  try {
    final products =
        await remoteDataSource.getProducts();

    cache.set(
      'products',
      products,
    );

    return products;
  } catch (_) {
    final cached =
        cache.get<List<Product>>(
      'products',
      maxAge: const Duration(days: 1),
    );

    if (cached != null) {
      return cached;
    }

    rethrow;
  }
}
This strategy prioritizes freshness while still providing fallback data.
Cache-First vs Network-First
| Strategy | Priority | Best For |
|---|---|---|
| Cache-first | Speed | Mostly stable data |
| Network-first | Freshness | Frequently changing data |
| Cache-only | Offline/local data | Offline screens |
| Network-only | Fresh server data | Sensitive/live operations |
| Stale-while-revalidate | Speed + freshness | Feeds/dashboard/content |
Choosing a strategy per endpoint is usually better than forcing one policy across the entire app.
Stale-While-Revalidate
A powerful caching pattern is stale-while-revalidate.
The idea is:
Cached Data Exists
       ↓
Show Immediately
       ↓
Fetch Fresh Data
       ↓
Update Cache
       ↓
Update UI
Instead of forcing users to wait for fresh data, the app shows the previous response immediately.
Then it silently refreshes the data.
This can make applications feel significantly faster.
Example Stale-While-Revalidate Flow
Suppose your dashboard has cached data.
When the user opens it:
0 ms
 ↓
Read Cache

50 ms
 ↓
Display Dashboard

Meanwhile
 ↓
GET /dashboard

Fresh Response
 ↓
Update Cache
 ↓
Update UI
The user sees useful information quickly while the application still attempts to obtain fresh data.
This pattern works particularly well for:
- News feeds
- Product listings
- Home dashboards
- User profiles
- Articles
- Categories
Persistent API Caching
Memory caching disappears when the app process terminates.
For persistent caching, the application can store serialized API data locally.
Conceptually:
API JSON
   ↓
Serialize
   ↓
Local Storage
   ↓
App Restart
   ↓
Read Local Storage
   ↓
Deserialize
For simple cache records, you might store:
{
  "cached_at": "2026-09-18T09:00:00Z",
  "data": {
    "id": 1,
    "name": "Rahul"
  }
}
The timestamp allows your application to determine whether the data is still fresh.
Persistent Cache Model
A reusable cache record can look like:
class CacheRecord {
  final String data;
  final DateTime cachedAt;

  CacheRecord({
    required this.data,
    required this.cachedAt,
  });

  Map<String, dynamic> toJson() {
    return {
      'data': data,
      'cached_at':
          cachedAt.toIso8601String(),
    };
  }

  factory CacheRecord.fromJson(
    Map<String, dynamic> json,
  ) {
    return CacheRecord(
      data: json['data'],
      cachedAt: DateTime.parse(
        json['cached_at'],
      ),
    );
  }
}
The exact storage implementation can then use Hive, Isar, Drift, or another local database.
Local Data Source Pattern
Instead of placing cache logic directly inside your repository, larger applications can create a dedicated local data source.
abstract class ProductLocalDataSource {
  Future<List<ProductDto>?> getProducts();

  Future<void> cacheProducts(
    List<ProductDto> products,
  );

  Future<void> clearProducts();
}
Remote source:
abstract class ProductRemoteDataSource {
  Future<List<ProductDto>> getProducts();
}
Repository:
class ProductRepositoryImpl {
  final ProductRemoteDataSource remote;
  final ProductLocalDataSource local;

  ProductRepositoryImpl({
    required this.remote,
    required this.local,
  });
}
Now the repository decides which source should be used.
Repository with Network-First Caching
Future<List<ProductDto>> getProducts() async {
  try {
    final remoteProducts =
        await remote.getProducts();

    await local.cacheProducts(
      remoteProducts,
    );

    return remoteProducts;
  } catch (_) {
    final cachedProducts =
        await local.getProducts();

    if (cachedProducts != null) {
      return cachedProducts;
    }

    rethrow;
  }
}
This creates a clean separation:
Repository
   ↓
Decides Data Strategy
   ↓
Remote / Local
The UI does not need to know where the data came from.
Using Entities with Cached Data
If you are using Clean Architecture, your data flow might be:
Remote API
   ↓
ProductDto
   ↓
Repository
   ↓
ProductEntity
   ↓
Controller
   ↓
UI
For cached data:
Local Database
   ↓
ProductLocalModel
   ↓
Repository
   ↓
ProductEntity
   ↓
Controller
   ↓
UI
Both sources return the same domain representation to the rest of the application.
API Caching with GetX
If your project uses GetX, caching should still remain below the controller.
For example:
class ProductController extends GetxController {
  final ProductRepository repository;

  ProductController(this.repository);

  final products = <ProductEntity>[].obs;
  final isLoading = false.obs;

  Future<void> loadProducts() async {
    try {
      isLoading.value = true;

      products.value =
          await repository.getProducts();
    } finally {
      isLoading.value = false;
    }
  }
}
The controller simply asks:
repository.getProducts();
It does not need to know whether the repository returned:
Memory Cache
Local Cache
Network Response
That decision belongs in the data layer.
Force Refresh
Sometimes the user explicitly wants fresh data.
For example:
Pull to Refresh
In this situation, you may want to bypass the cache.
A useful repository API is:
Future<List<ProductEntity>> getProducts({
  bool forceRefresh = false,
}) async {
  if (!forceRefresh) {
    final cached = await getCachedProducts();

    if (cached != null) {
      return cached;
    }
  }

  final products =
      await fetchRemoteProducts();

  await saveProducts(products);

  return products;
}
Normal request:
repository.getProducts();
Pull-to-refresh:
repository.getProducts(
  forceRefresh: true,
);
This provides explicit control over freshness.
Flutter RefreshIndicator Example
RefreshIndicator(
  onRefresh: () async {
    await controller.loadProducts(
      forceRefresh: true,
    );
  },
  child: ListView.builder(
    itemCount: controller.products.length,
    itemBuilder: (context, index) {
      return ProductCard(
        product:
            controller.products[index],
      );
    },
  ),
)
Now normal navigation can use cached data while pull-to-refresh forces a new network request.
Cache Invalidation
Caching data is easy.
Knowing when to delete or update it is the harder part.
This is called cache invalidation.
Suppose you cache:
GET /profile
Then the user updates their name:
PUT /profile
Your cached profile may now contain the old name.
You need to invalidate or update that cache.
Invalidate Cache After Mutations
For example:
Future<void> updateProfile(
  UpdateProfileDto request,
) async {
  await remote.updateProfile(request);

  cache.remove('user_profile');
}
The next profile request fetches fresh data.
Flow:
Update Profile
     ↓
API Success
     ↓
Delete Profile Cache
     ↓
Next GET
     ↓
Fresh API Data
Update Cache Instead of Deleting It
Sometimes you already have the fresh object after an update.
Suppose the server returns:
{
  "id": 1,
  "name": "Ankit Kumar"
}
Instead of:
cache.remove('profile');
you can directly replace it:
cache.set(
  'profile',
  updatedProfile,
);
This prevents another unnecessary network request.
Cache Invalidation After Delete
Suppose a product is deleted.
Before:
products = [1, 2, 3, 4]
After:
DELETE /products/3
your cache may still contain:
[1, 2, 3, 4]
You can either invalidate the entire product list:
cache.remove('products');
or update it:
final updatedProducts =
    cachedProducts
        .where(
          (product) => product.id != 3,
        )
        .toList();

cache.set(
  'products',
  updatedProducts,
);
The right strategy depends on application complexity and server behavior.
Cache Invalidation After Logout
User-specific cache should usually be cleared when the authenticated user logs out.
For example:
Future<void> logout() async {
  await tokenStorage.clearTokens();

  await cacheManager.clearUserCache();
}
Otherwise, imagine:
User A logs in
 ↓
Profile cached
 ↓
User A logs out
 ↓
User B logs in
 ↓
User A's cached profile appears
Besides being incorrect, this can become a privacy issue.
User-Specific Cache Keys
Another safeguard is to scope caches by user.
Instead of:
profile
use:
profile_123
where 123 represents the authenticated user ID.
Likewise:
orders_123
wishlist_123
notifications_123
This reduces accidental cache collisions between user sessions.
Sensitive user data still needs appropriate storage and cleanup policies.
Pagination and API Caching
Pagination requires more careful cache design.
Suppose you request:
/products?page=1
/products?page=2
/products?page=3
Store pages separately:
products_page_1
products_page_2
products_page_3
or maintain a structured paginated cache.
Avoid storing every page under:
products
unless your cache manager intentionally merges pages.
Search Result Caching
Consider:
GET /products?search=iphone
and:
GET /products?search=macbook
These must use different cache keys.
For example:
String searchCacheKey(
  String query,
) {
  return 'search_${query.trim().toLowerCase()}';
}
For more complicated APIs, generate cache keys from normalized query parameters.
Avoid Duplicate Network Requests
Caching does not automatically prevent this situation:
Widget A → GET /products
Widget B → GET /products
Widget C → GET /products
If the cache is empty and all requests start simultaneously, all three might hit the network before the first response is cached.
One solution is request deduplication.
Conceptually:
Request A ─┐
Request B ─┼→ Same in-flight request
Request C ─┘
You can maintain:
final Map<String, Future<dynamic>>
    _inFlightRequests = {};
Then reuse the existing future when an identical request is already running.
Simple Request Deduplication
class RequestManager {
  final Map<String, Future<dynamic>>
      _requests = {};

  Future<T> run<T>(
    String key,
    Future<T> Function() request,
  ) {
    final existing = _requests[key];

    if (existing != null) {
      return existing as Future<T>;
    }

    final future = request();

    _requests[key] = future;

    future.whenComplete(() {
      _requests.remove(key);
    });

    return future;
  }
}
Usage:
final products =
    await requestManager.run(
  'products',
  () => remote.getProducts(),
);
Now simultaneous requests can share the same network operation.
HTTP-Level Caching
Application-level caching is not the only caching mechanism available.
HTTP itself provides caching mechanisms such as:
Cache-Control
ETag
If-None-Match
Last-Modified
If-Modified-Since
These can help the client and server avoid transferring unchanged responses.
For example, a server might return:
ETag: "products-v24"
Later, the client can send:
If-None-Match: "products-v24"
If the resource has not changed, the server may respond:
304 Not Modified
instead of sending the full resource again.
When you control both Flutter and the backend, HTTP cache semantics are worth considering alongside application-level caching.
Cache-Control
The server may return:
Cache-Control: max-age=300
This indicates that the response may be considered fresh for a period such as 300 seconds, depending on the cache context and other directives.
Rather than hardcoding every TTL in Flutter, some systems use server-provided cache policy where appropriate.
That allows the backend to influence freshness requirements.
API Cache with Dio Interceptors
You can also implement caching at the Dio interceptor level.
Conceptually:
class CacheInterceptor extends Interceptor {
  final CacheManager cache;

  CacheInterceptor(this.cache);

  @override
  void onRequest(
    RequestOptions options,
    RequestInterceptorHandler handler,
  ) {
    // Check cached response.

    handler.next(options);
  }

  @override
  void onResponse(
    Response response,
    ResponseInterceptorHandler handler,
  ) {
    // Cache successful response.

    handler.next(response);
  }
}
This approach can centralize generic HTTP caching behavior.
However, repository-level caching is often easier when different features require different business rules.
Interceptor Cache vs Repository Cache
Interceptor caching works well for generic HTTP-level policies.
Repository caching works well when caching depends on business meaning.
For example:
Products → cache 5 minutes
Categories → cache 12 hours
Profile → cache 10 minutes
Checkout → never cache
A repository understands these differences better than a generic HTTP interceptor.
In larger applications, both approaches can coexist.
Do Not Cache Errors
Suppose:
GET /products
      ↓
500 Internal Server Error
Do not accidentally cache that error response as valid product data.
Usually, cache only successful responses that meet your expected validation rules.
For example:
if (response.statusCode == 200) {
  await cache.save(
    key,
    response.data,
  );
}
Be Careful with Empty Responses
An empty response is not necessarily an error.
For example:
{
  "data": []
}
might be a completely valid response.
Do not automatically interpret:
empty list = invalid cache
Otherwise, the app could repeatedly request an endpoint whose correct response is simply an empty list.
Offline-First Flutter Applications
Caching becomes especially important when building offline-first applications.
An offline-first flow might be:
Screen
  ↓
Local Database
  ↓
Display Cached Data
  ↓
Network Available?
  ↙          ↘
Yes           No
 ↓             ↓
Sync API     Continue
 ↓           Offline
Update DB
 ↓
Update UI
In this architecture, the local database may become the primary source observed by the UI.
The network synchronizes the local database rather than directly feeding every widget.
This is more complex than basic API caching, but it can provide a much stronger offline experience.
Cache Metadata
For advanced caching, storing only data may not be enough.
You may want:
class CacheMetadata {
  final DateTime createdAt;
  final DateTime? expiresAt;
  final String? etag;
  final String? version;

  const CacheMetadata({
    required this.createdAt,
    this.expiresAt,
    this.etag,
    this.version,
  });
}
Then a cache record can contain:
Data
Created At
Expires At
ETag
Version
This provides much more control over invalidation and validation.
Generic Cache Entry
A useful generic representation could be:
class CacheEntry<T> {
  final T data;
  final DateTime cachedAt;
  final Duration ttl;

  const CacheEntry({
    required this.data,
    required this.cachedAt,
    required this.ttl,
  });

  bool get isExpired {
    return DateTime.now().isAfter(
      cachedAt.add(ttl),
    );
  }

  bool get isValid => !isExpired;
}
Usage:
final cacheEntry = CacheEntry(
  data: products,
  cachedAt: DateTime.now(),
  ttl: const Duration(minutes: 5),
);

if (cacheEntry.isValid) {
  return cacheEntry.data;
}
This keeps expiration logic inside the cache abstraction.
Should You Cache POST Requests?
Usually, caching is primarily associated with read operations such as:
GET
You should be careful about automatically caching:
POST
PUT
PATCH
DELETE
because these operations commonly modify server state.
However, some APIs use POST for read-only searches or complex queries.
Therefore, base your caching policy on endpoint semantics rather than HTTP method alone.
Handling Refresh After Create
Imagine:
GET /products
 ↓
Cache Products

POST /products
 ↓
Create New Product
The existing product cache is now stale.
After successful creation:
await createProduct(request);

cache.remove('products');
Then the next product request gets fresh data.
Alternatively, insert the returned product into the local cache if the server response contains the authoritative created object.
Handling Cache During Update
The same applies to:
PUT /products/42
You can:
Option A
Invalidate product cache

Option B
Update cached product directly

Option C
Refetch affected data
There is no single correct strategy for every application.
The best option depends on whether the server may modify additional fields during the operation.
Preventing Memory Problems
Do not allow your memory cache to grow forever.
This:
final Map<String, dynamic> cache = {};
can eventually hold a large amount of data if entries are never removed.
Production cache managers often use policies such as:
TTL expiration
Maximum number of entries
Maximum storage size
Least recently used eviction
Manual invalidation
Session cleanup
If your application caches large images, videos, or files, use dedicated file/image caching solutions rather than storing everything as arbitrary Dart objects.
Image Caching Is Different
Flutter already provides image caching behavior through its image pipeline, and packages can provide more advanced network-image caching.
API JSON caching and image caching solve different problems.
For example:
GET /products
might return product metadata.
The response contains:
name
price
imageUrl
Caching the API response does not necessarily mean the image bytes themselves are persistently cached.
Treat API-response caching and media caching as separate concerns.
Cache Security
Avoid storing highly sensitive information in an unprotected cache simply because caching is convenient.
Be particularly careful with:
Authentication credentials
Payment information
Private personal data
Security tokens
Sensitive documents
Authentication tokens should follow a dedicated security/storage strategy.
Additionally, user-specific cached content should be cleared appropriately during logout or account switching.
Testing API Caching
Caching logic should be tested separately from UI code.
For example:
test(
  'returns cached products when cache is valid',
  () async {
    // Arrange cache.

    // Call repository.

    // Verify remote API was not called.
  },
);
Another important test:
test(
  'fetches API when cache has expired',
  () async {
    // Arrange expired cache.

    // Call repository.

    // Verify API request.

    // Verify cache updated.
  },
);
Also test:
Cache missing
Cache expired
Network success
Network failure
Cache fallback
Force refresh
Cache invalidation
Concurrent requests
Logout cleanup
These cases catch many production caching bugs.
Common API Caching Mistakes
Caching everything
Not every endpoint benefits from caching.
Use caching where it improves performance or resilience without violating freshness requirements.
Never expiring cached data
A cache without an expiration or invalidation strategy can become a source of stale data.
Caching inside widgets
Avoid:
class ProductScreen extends StatelessWidget {
  final Map cache = {};
}
Caching belongs in the data/infrastructure layer.
Using one cache key for different requests
These are different resources:
products?page=1
products?page=2
products?category=shoes
Your cache keys need to reflect that.
Forgetting mutations
After:
POST
PUT
PATCH
DELETE
related cached GET responses may become stale.
Ignoring user sessions
Do not accidentally display one user’s cached private data to another user.
Keeping unlimited memory cache
Always consider eviction and expiration.
Treating cached data as permanently correct
Cache is a performance and resilience mechanism, not automatically the source of truth.
Recommended Caching Strategy for Flutter
For many applications, a practical architecture is:
Flutter UI
     ↓
Controller
     ↓
Repository
     ↓
Memory Cache
     ↓
Persistent Cache
     ↓
Remote API
The repository determines the appropriate source.
For example:
Memory available + fresh
        ↓
Return immediately

Memory unavailable
        ↓
Persistent cache available
        ↓
Return / Revalidate

Cache unavailable or stale
        ↓
API Request
        ↓
Save Persistent Cache
        ↓
Save Memory Cache
        ↓
Return
This gives you a flexible foundation for both performance and offline support.
A Practical Cache Policy
Instead of using the same strategy everywhere, define policies by feature.
For example:
Categories
→ Cache-first
→ TTL: several hours

Products
→ Cache-first or stale-while-revalidate
→ Short TTL

User Profile
→ Cache-first
→ Invalidate after profile update

Dashboard
→ Stale-while-revalidate

Search
→ Short-lived cache

Checkout
→ Network-first/network-only

Payment Status
→ Network-only or server-driven real-time updates
This is much better than blindly applying one global caching rule.
Complete API Caching Flow
A production-style caching architecture can look like:
                    UI
                     ↓
                 Controller
                     ↓
                 Repository
                     ↓
               Check Memory
                 ↙       ↘
             Valid       Missing
               ↓            ↓
            Return      Local Cache
                         ↙       ↘
                     Valid      Missing/
                       ↓        Expired
                    Return         ↓
                               Remote API
                                   ↓
                                Success
                                   ↓
                           Save Local Cache
                                   ↓
                          Save Memory Cache
                                   ↓
                                Return
You can modify this flow depending on whether the endpoint uses cache-first, network-first, or stale-while-revalidate behavior.
API Caching Best Practices
For a reliable Flutter caching system:
- Keep caching outside the UI layer.
- Define clear cache keys.
- Use TTL where time-based expiration makes sense.
- Use different cache policies for different endpoints.
- Invalidate affected cache after mutations.
- Clear private user cache during logout/account changes.
- Prevent duplicate simultaneous API requests.
- Do not cache failed responses as valid data.
- Treat empty successful responses correctly.
- Use persistent storage when offline support is required.
- Limit memory cache growth.
- Consider server HTTP caching headers when supported.
- Use force-refresh for explicit user refresh actions.
- Test cache hits, misses, expiration, failures, and invalidation.
- Avoid caching highly sensitive information without an appropriate security design.
Final Thoughts
API caching in Flutter should not simply mean:
if (cache != null) {
  return cache;
}
A production-ready caching system needs to answer several questions:
What should be cached?

Where should it be cached?

How long should it remain fresh?

What happens when the network fails?

What happens when data changes?

When should the cache be invalidated?

How should pagination and filters be cached?

What happens when multiple identical requests run together?
For many Flutter applications, a clean architecture is:
UI
 ↓
Controller / State Management
 ↓
Repository
 ↓
Cache Strategy
 ↙          ↘
Local       Remote API
Data
For frequently viewed content, cache-first provides excellent performance. For data where freshness matters more, network-first may be appropriate. For dashboards, feeds, and content-heavy screens, stale-while-revalidate often provides an excellent balance between speed and freshness.
Most importantly, do not put caching logic throughout your screens and controllers.
Keep caching centralized inside repositories, local data sources, cache managers, or appropriate networking infrastructure. Doing so makes your Flutter application faster, easier to maintain, more resilient to poor networks, and much easier to scale as additional APIs and features are introduced.